How to Use the Calculator
For all new and existing patients, you may enter their pre-op data and use the calculator, to calculate their recommended EVO lens powers and length. To begin the use of the calculator:
Click the + Add pre-op data button.
If you created a new patient in the system, after clicking Save from the patient information entry section, you will automatically be taken to the calculator page if a surgeon is selected for the patient. Otherwise, the + Add pre-op data button is accessible on the Patient Details page or the Patient Details Preview panel.
After clicking the + Add pre-op data button, the calculator screen is displayed with the pre-op data fields and a visual diagram of each eye.

Select the eye for which to input pre-op data.
Note: You can input data for each eye interchangeably by clicking on the EDIT OD or EDIT OS button or anywhere on the eye’s respective half of the screen.
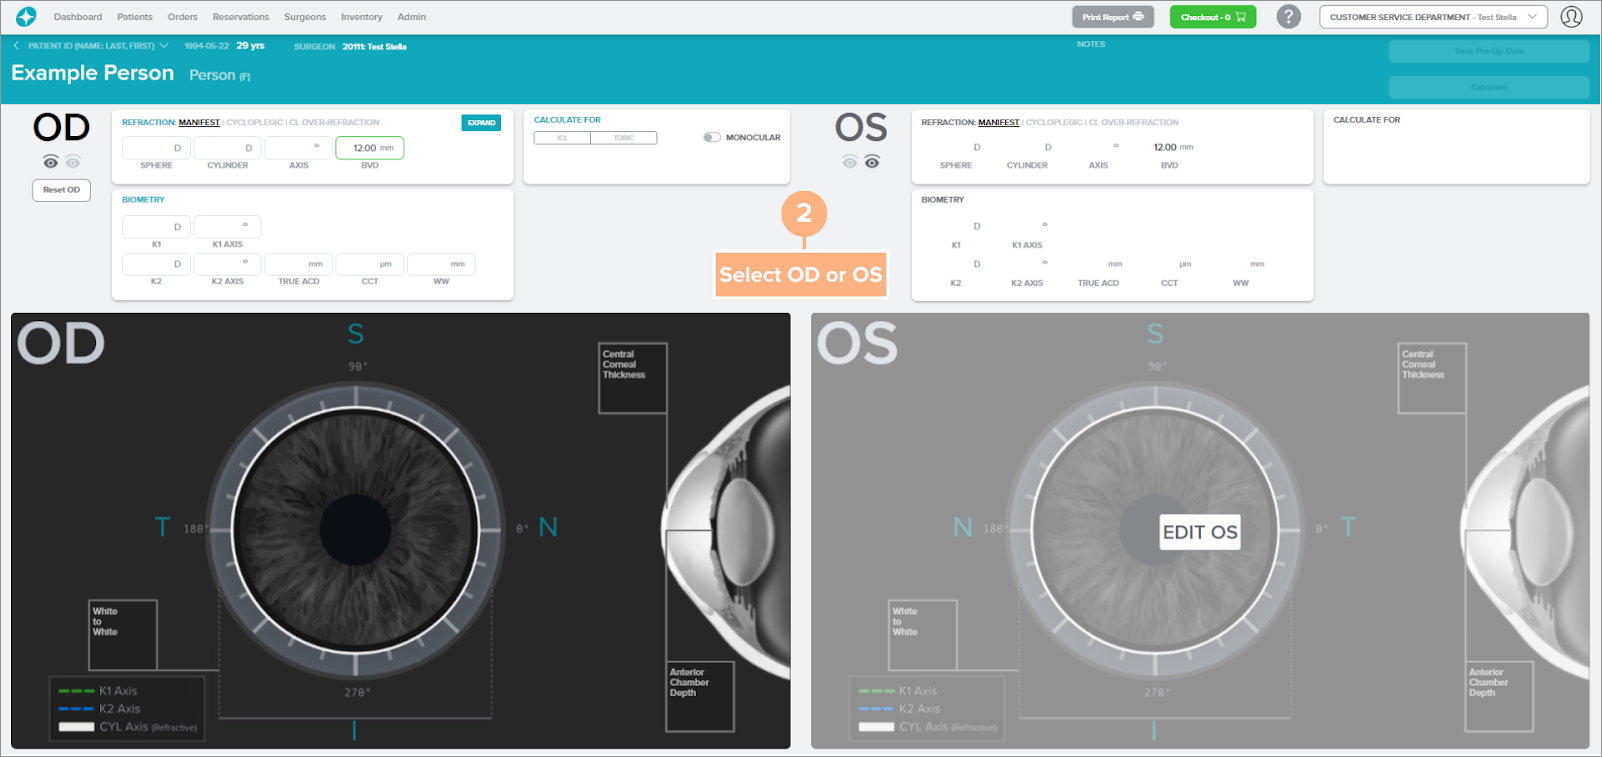
Click the EXPAND button to view the refraction options. Then click on the radio button to select the desired refraction, either Manifest, Cycloplegic, or CL Over-Refraction.

Click the COLLAPSE button to exit out of the refraction selection.

Enter the patient’s refraction and biometry data.
Notes:
- Pre-op data may be entered for all refraction types but only one can be applied for calculation.
- As you enter data in the fields, pop-up messages will appear to help guide your data entry. You may also refer to the Pre-Op Data Valid Values chart below to view the valid range for each field.
- The Reset OD and Reset OS buttons are available if you need to make changes to your pre-op data inputs. Please keep in mind that this will clear all pre-op data entered for the operative eye.

Select the type of lens to calculate for, either ICL or Toric.
Note: If you are only calculating for one eye, you can click on the Monocular toggle button.

Follow the same steps above if calculating for the other eye.

Click the Save Pre-Op Data button, to store the pre-op data for the patient.

Click the Calculate button to perform the lens calculation.

After calculation, the target lens selection screen will appear with the recommended EVO lens powers, length, and expected postoperative refraction.
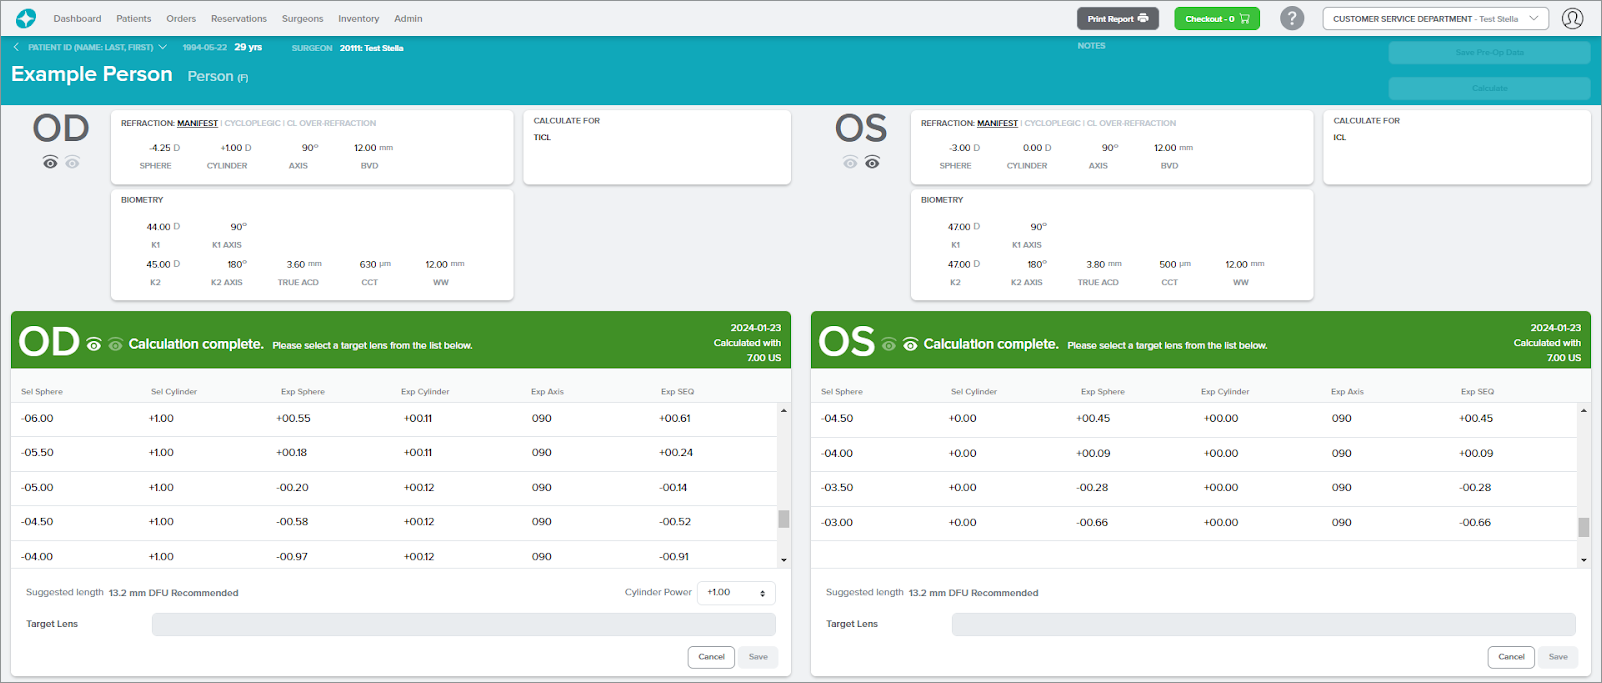
Unavailable Lenses
A message on the target lens selection screen will indicate when no lens is available for the patient’s refractive error. The following messages may appear:
- Currently STAAR does not manufacture lenses to correct mixed astigmatism.
- There is no lens available for this patient's refractive error.
- At this time STAAR does not have a lens available to fully correct your patient's refractive error. Scroll the display window to view available lenses and their predicted refractive outcomes.
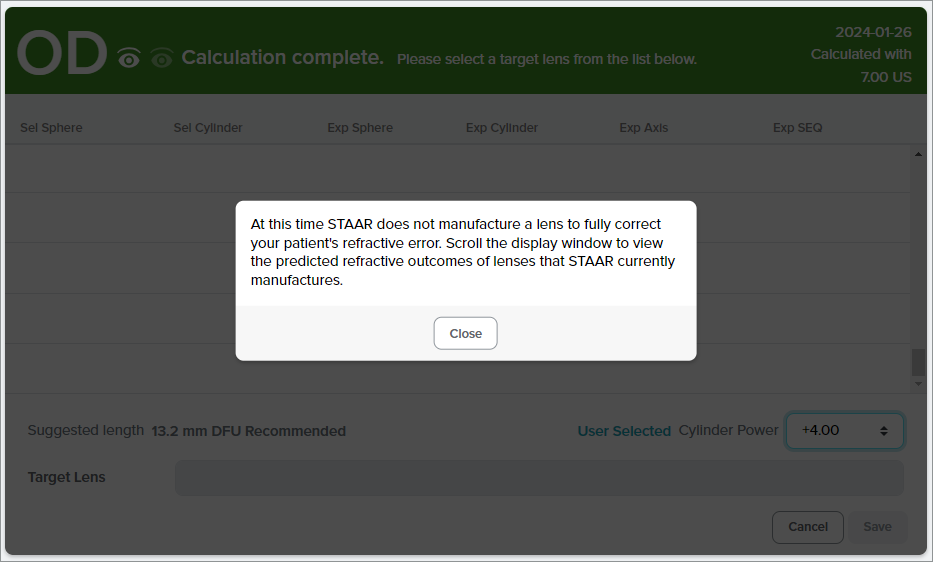
- At this time STAAR does not manufacture a lens to fully correct your patient's refractive error. Scroll the display window to view the predicted refractive outcomes of lenses that STAAR currently manufactures.
Example: When STAAR does not manufacture a lens to fully correct your patient’s refractive error.
Pre-Op Data Valid Values
| BVD | 4.00 mm to 17.00 mm |
| Sphere | -20.00 D to -0.25 D |
| Cylinder | -4.00 D to 4.00 D |
| Axis | 0 to 180 degrees |
| Keratometric Power (K1) | 30.00 D to 60.00 D |
| K1 axis | 0 to 180 degrees |
| Keratometric Power (K2) | 30.00 D to 60.00 D |
| K2 axis | 0 to 180 degrees |
| True Anterior Chamber Depth | 3.00 mm to 4.50 mm |
| Corneal Thickness (CCT) | 300 µm to 900 µm |
| White to White | 10.50 mm to 12.90 mm |
| CL Sphere | -20.0 D to 0.00 D |
Please note:
- K1 and K2 axis must be 90 degrees apart
- CCT measurement is now in micrometers, previously it was in millimeters
- When performing CL Over-Refraction, the sphere cannot be plano and the spherical equivalent cannot be hyperopic
Error and Warning Messages
As you enter, save, and calculate on the pre-op data screen, you may encounter error and warning messages.
The following errors may occur while using the calculator:
- For missing data fields, the field is highlighted in red.
- For invalid data entries and when K1 axis and K2 axis are not 90 degrees apart, the data field is highlighted in red along with a red error pop-up message.
Example: When the data entry for K1 axis and K2 axis are not 90 degrees apart, and when there are missing data fields for the right eye.

The yellow warning messages may appear when the calculator recognizes the following instances:
- To confirm the use of a refraction type for OD and OS calculations.
- To confirm the use of a refraction type for OD or OS calculation.
- You have selected a CL Over-Refraction with the Contact Lens Sphere set 0 D for both OS and OD.
- You have selected a CL Over-Refraction with the Contact Lens Sphere set to 0 D.
- Switching to Monocular for OD or OS
- You have selected refraction and entered a Sphere value between a range that is reserved for CL Over-Refraction.
- You have selected a spherical ICL for this patient's eye which has a certain level of astigmatism. Please confirm appropriate option for this eye (ICL or TICL).
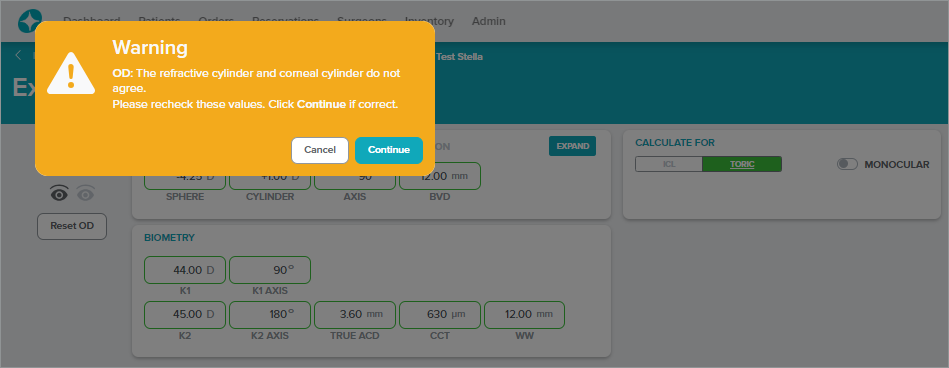
- The refractive cylinder and corneal cylinder do not agree.
Example: After clicking on the Save Pre-Op Data button, a yellow warning message appears to indicate that the OD cylinder and corneal cylinder do not agree. To recheck the values on the pre-op data page, click on the Cancel button or to proceed, click on the Continue button.
Have trouble accessing the calculator?
If you are unable to access the calculator because the +Add pre-op data button is unclickable—please ensure that your patient is assigned to an active surgeon. No pre-op data can be entered for a patient if no surgeon is assigned or if the selected surgeon is inactive.
Note: Inactive surgeons will have an * next to their name.
To edit a patient’s information, refer to How to Edit Patient Details.
How to Select a Target Lens
After a calculation, the target lens selection screen appears with the recommended EVO lens powers, DFU recommended target lens length and expected postoperative refraction.
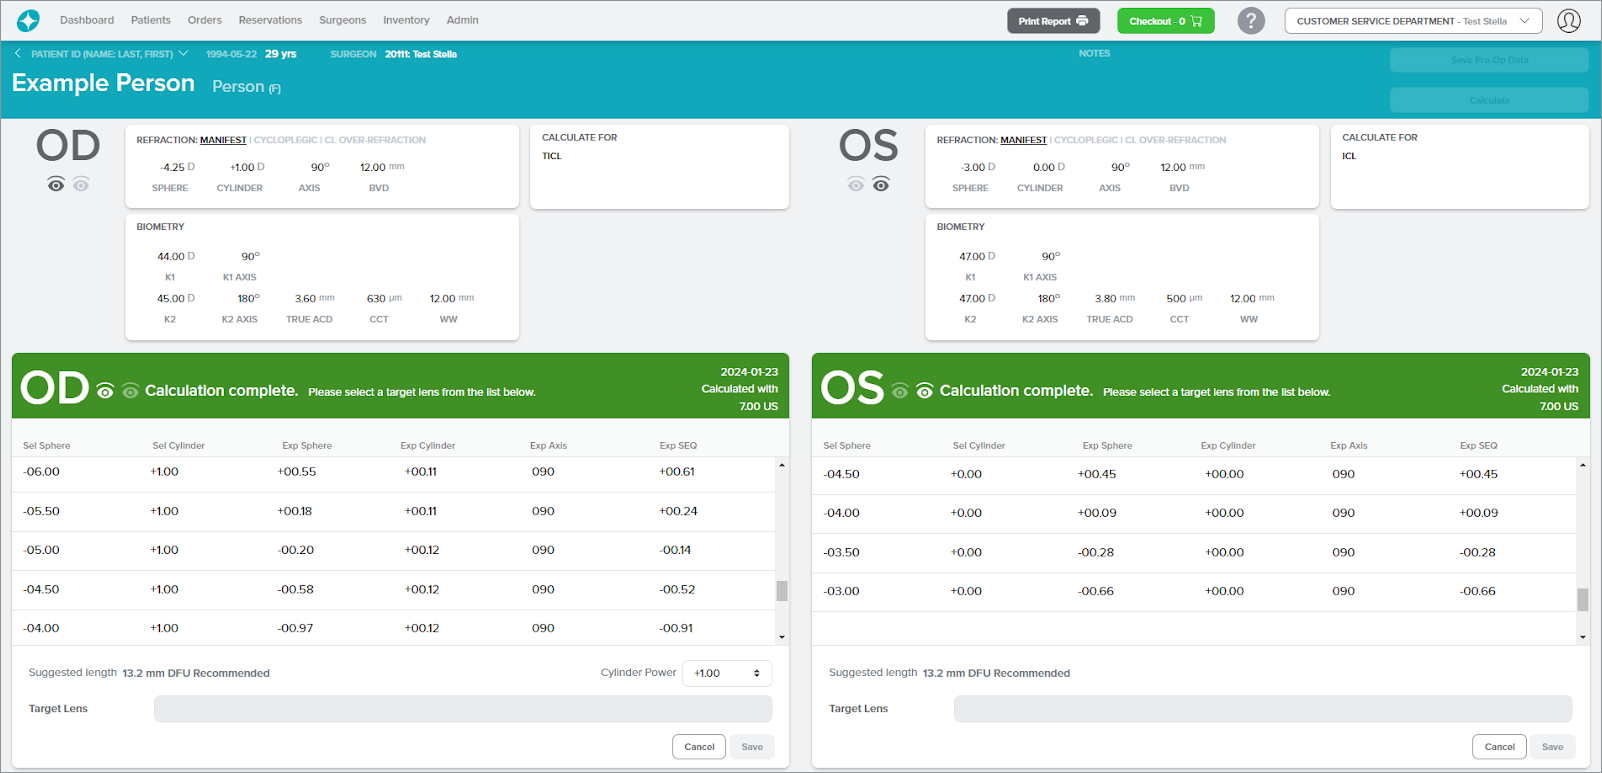
To select the desired target lens:
Click on the desired target lens from the list.
Note: The selected target lens is highlighted in blue.

For Toric lenses, you also have the option to change the cylinder power. Confirm or click on the Cylinder Power drop-down button to select a different cylinder power.

To save your target lens selection, click Save.

Follow the same steps above if applicable for the other eye.

The selected target lens is saved and the Inventory Lookup button appears where you can view the available lenses in inventory. If you notice there are incorrect values on the pre-op data entered, you can always return to the pre-op data entry screen and make changes as necessary by clicking on the Cancel button.
How to Access Saved Pre-Op Data / Calculations
To easily access a patient’s saved pre-op data and calculations:
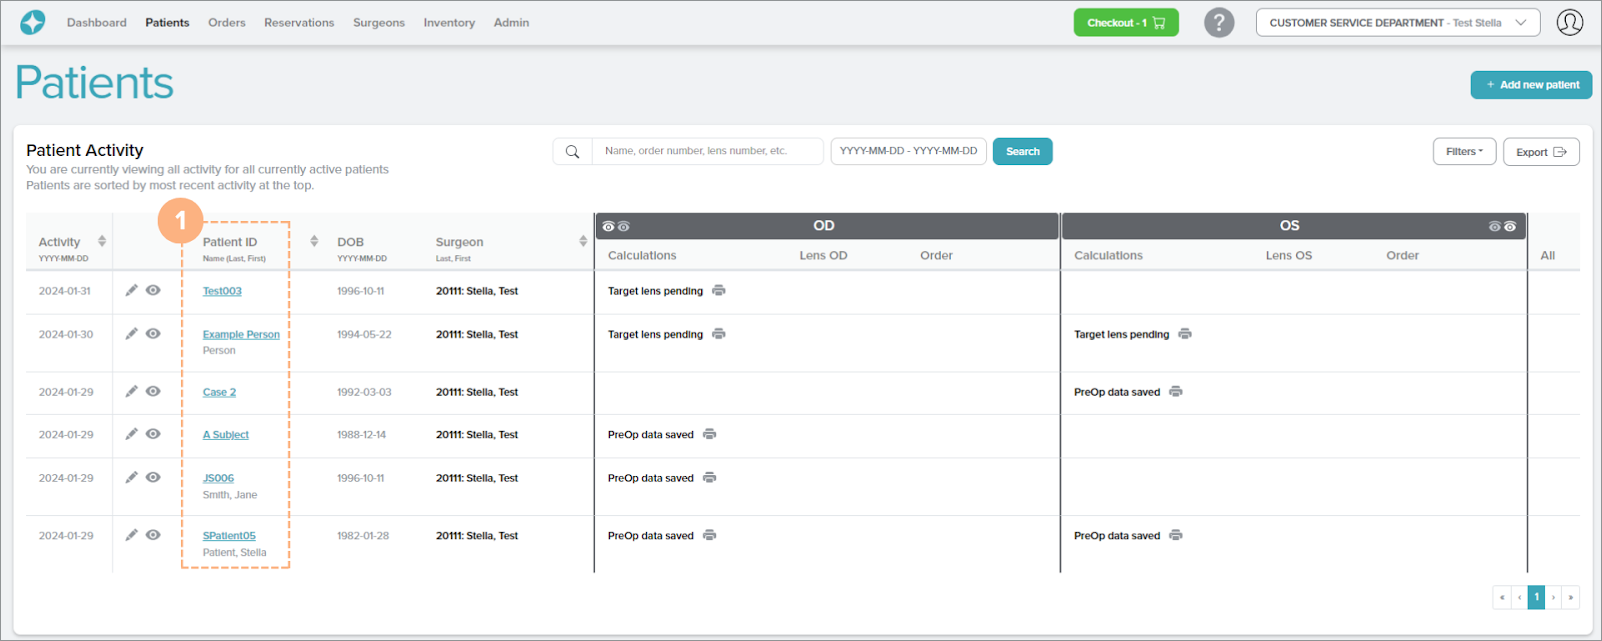
Click on a Patient ID.
Note: The Patient ID is accessible on the Patients, Dashboard, and Reservations tabs
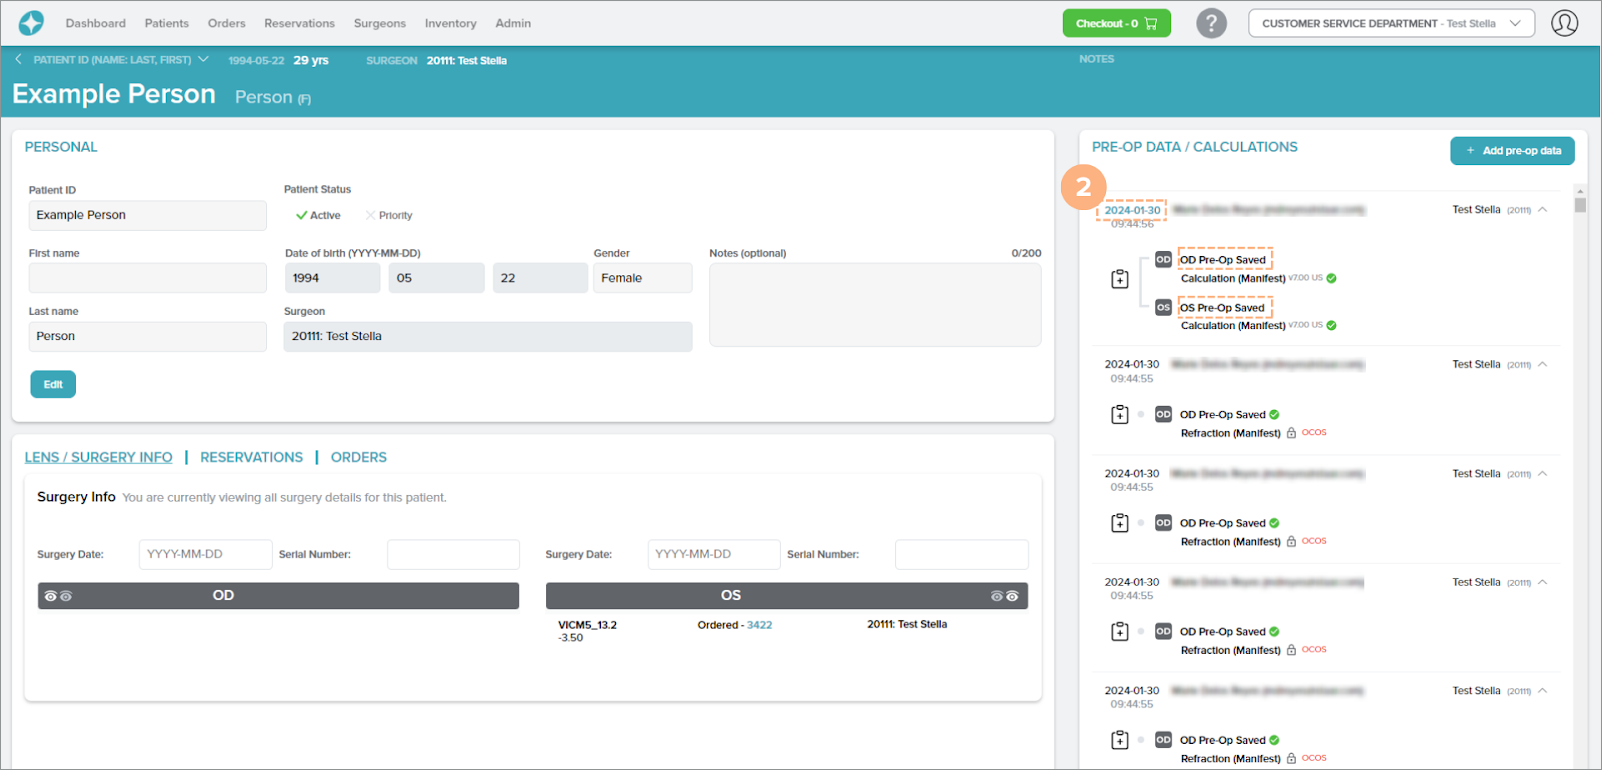
On the right-hand section of the Patient Details page is the PRE-OP DATA / CALCULATIONS. To access the saved pre-op data/calculations and enter the calculator screen, click the hyperlinked date for the pre-op data/calculation or click the bolded text that indicates OD Pre-Op Saved or OS Pre-Op Saved.
Note: For patients with pre-op data/calculations imported from our previous platform, OCOS, the pre-op data/calculations are marked with a red “OCOS” next to it. These calculations are locked but can be copied into a new set.
The screen proceeds to the calculator screen with your saved pre-op data/calculation.
How to Copy a Saved Pre-Op Data to a New Set
To duplicate a saved pre-op data to a new set (including imported pre-op data from OCOS):
Click on the Copy this pre-op data to a new set.
The Copy this pre-op data to a new set button is accessible on the Patient Details page or the Patient Details Preview panel, under the PRE-OP DATA / CALCULATIONS section.
When accessed through the Patient Details page:

Make any changes if necessary from the pre-filled data.
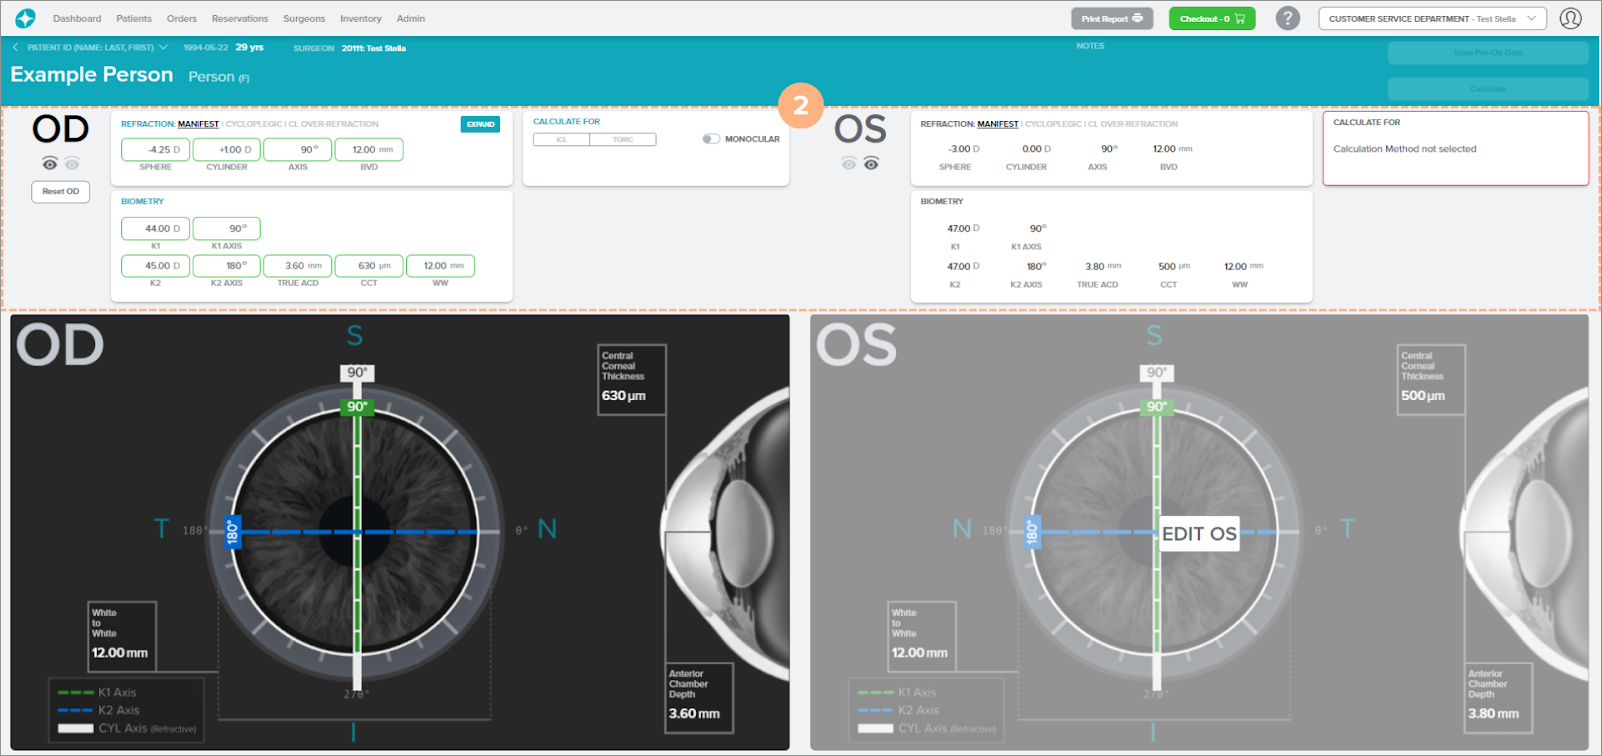
Select the type of lens to Calculate for, either ICL or Toric.

Click Save Pre-Op Data.

Once the pre-op data is saved, the new set of pre-op data is created and can be viewed on the PRE-OP DATA / CALCULATIONS section of the Patient Details page and the Patient Details Preview panel. The date on each saved pre-op data will help indicate when the pre-op data was created or when it was most recently edited.