How to Reserve Lenses
After selecting and saving a target lens from the target lens selection screen, you can access the Inventory Lookup and select a lens to Reserve, Add to Cart, or Manufacture. If you are not ready to order a lens for purchase, you may reserve a lens:
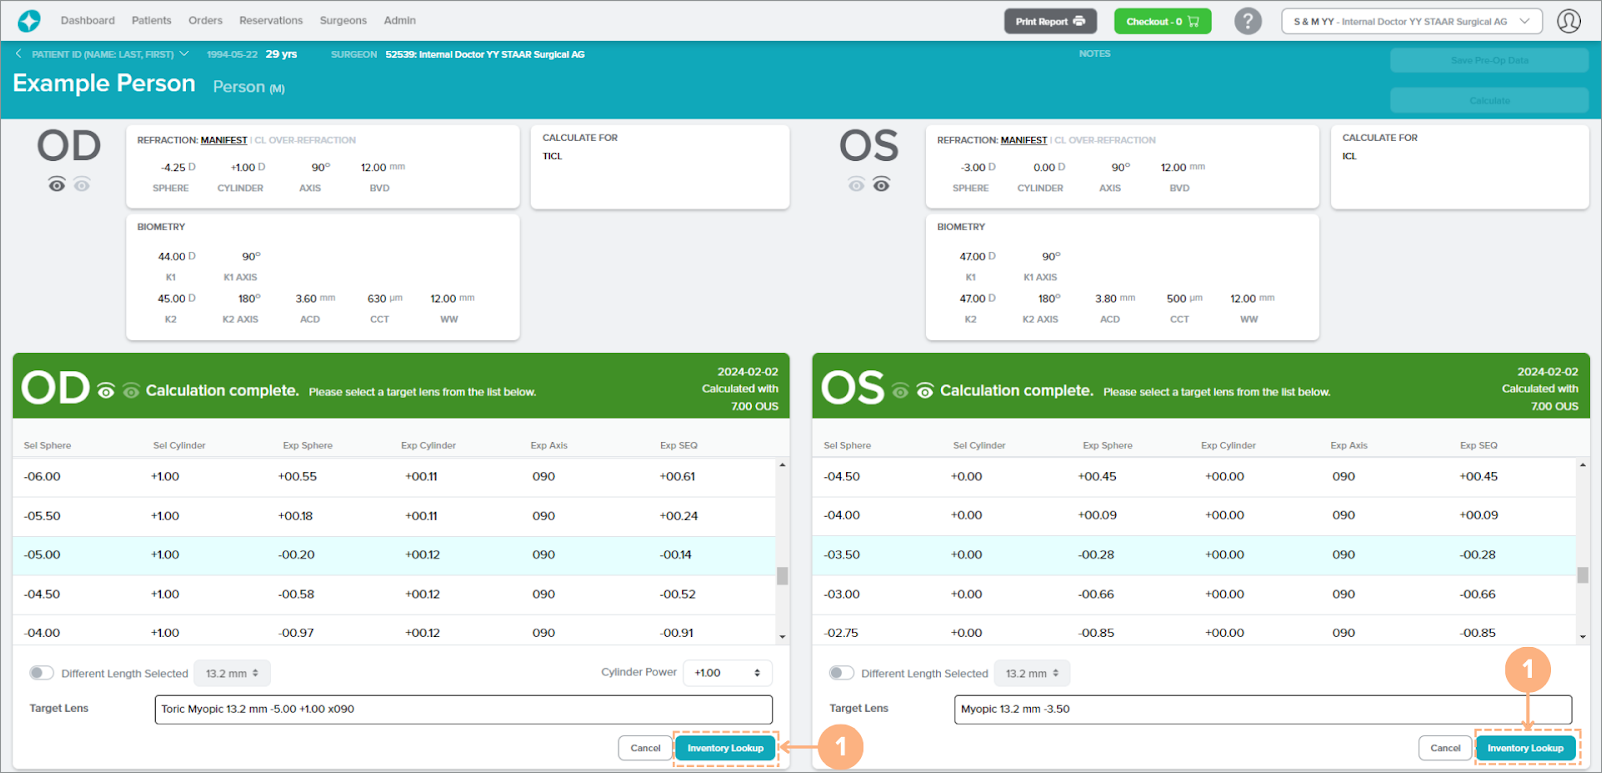
Click on the Inventory Lookup button. You may view the inventory lookup for either eye, one at a time (if applicable).
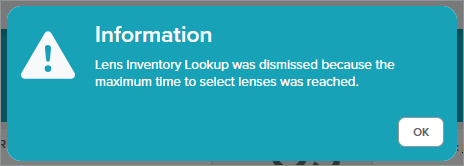
You have 20 minutes to select the lenses to reserve from the Inventory Lookup screen. If the selection is not completed within that time, the lens inventory lookup screen will clear and you will be returned to the Target Lens Selection screen with the message indicated below.
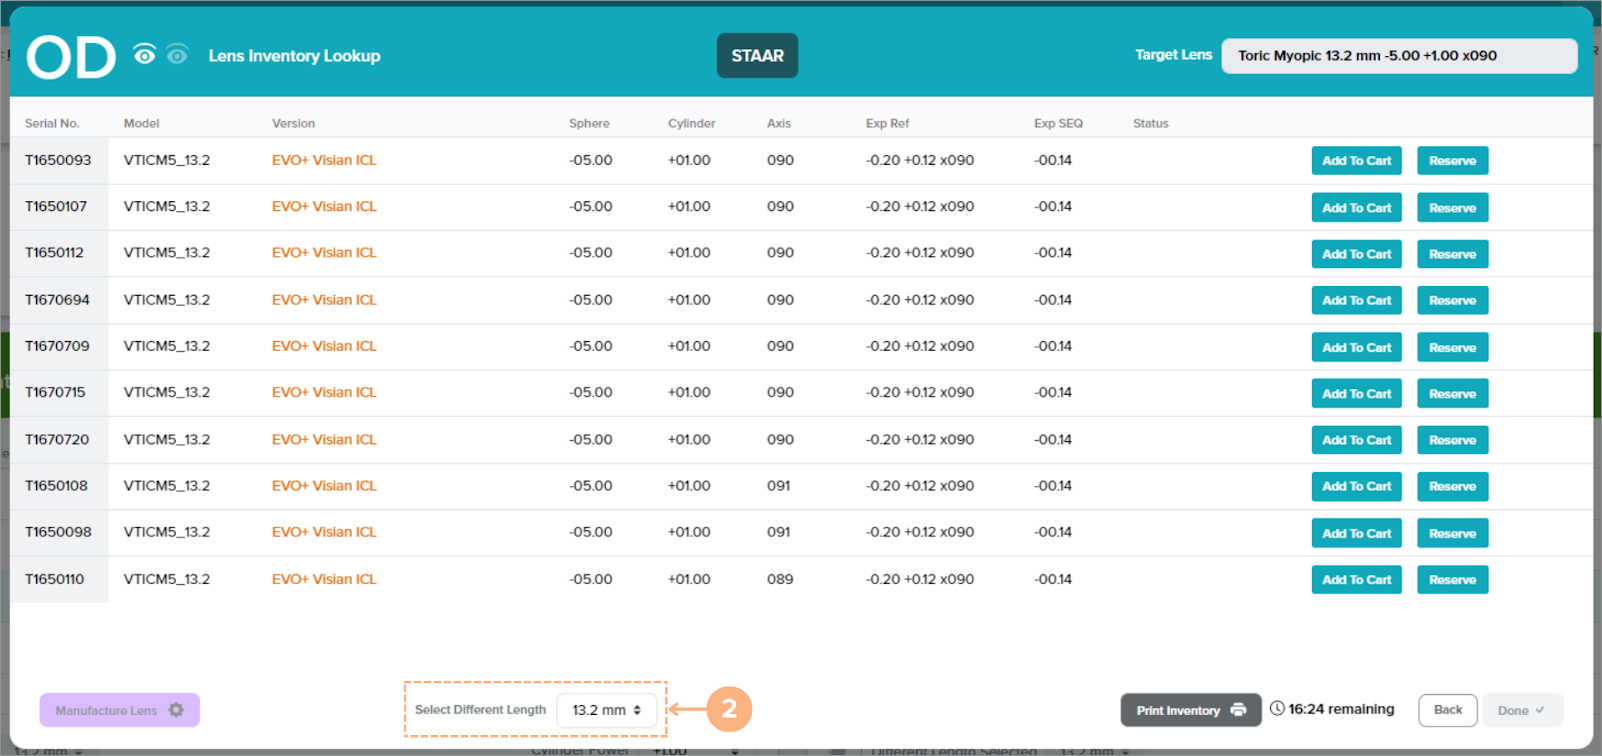
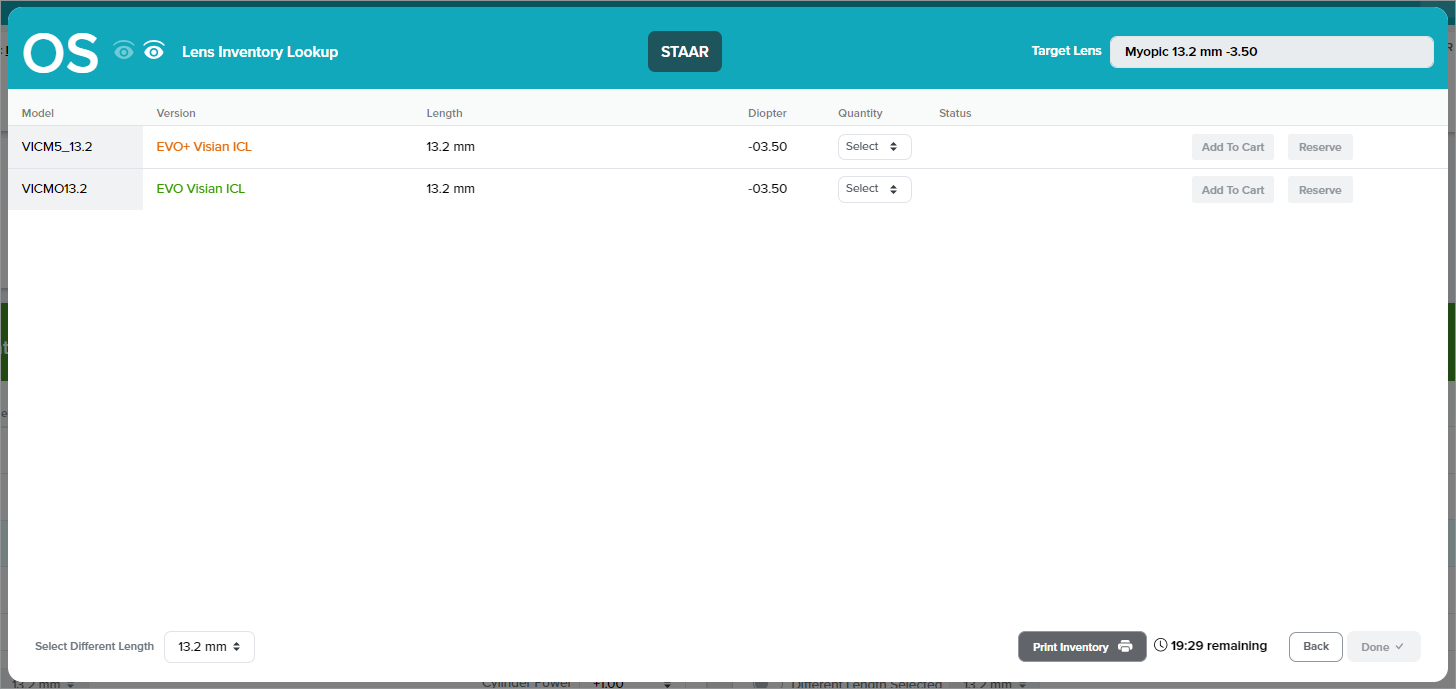
Confirm or select a different target lens length. To change the target lens length selection, click on the Select Different Length drop-down button and select the desired length.
Note: A recommended target lens length is automatically selected but you may change this selection. If a different target lens length is selected, a new set of lenses with the new calculated powers and expected post-op outcomes will be displayed.
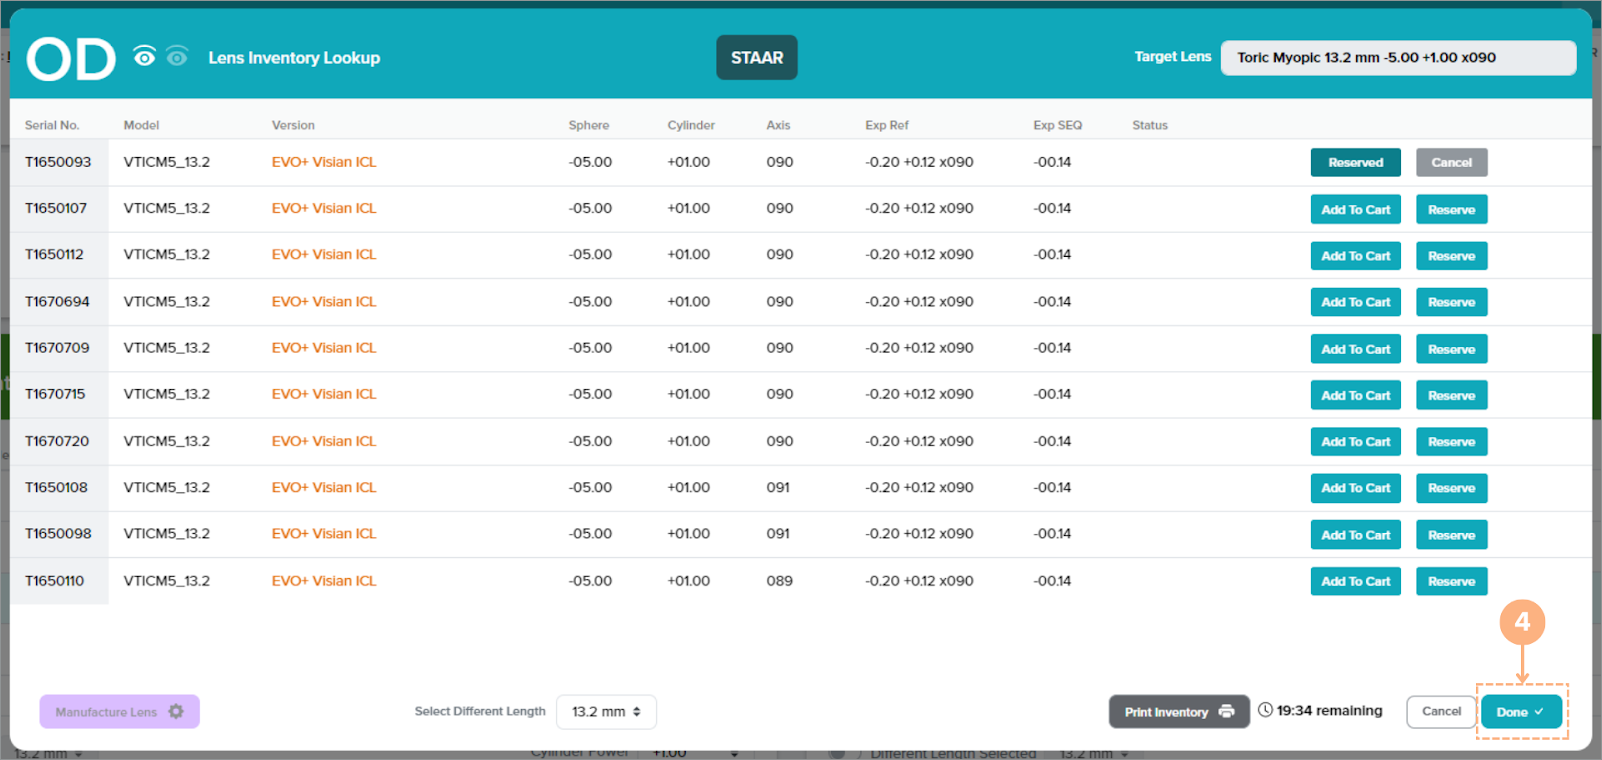
Lens Inventory Lookup Note: For Toric lenses, the real-time Lens Inventory Lookup screen displays a list of up to 10 available lenses within a half-diopter of the desired sphere or cylinder with the lens powers and predicted postoperative outcomes. The lens closest to your Target Lens is displayed at the top of the list. And if you would like to return to the target lens selection screen, you can click on the Back button.
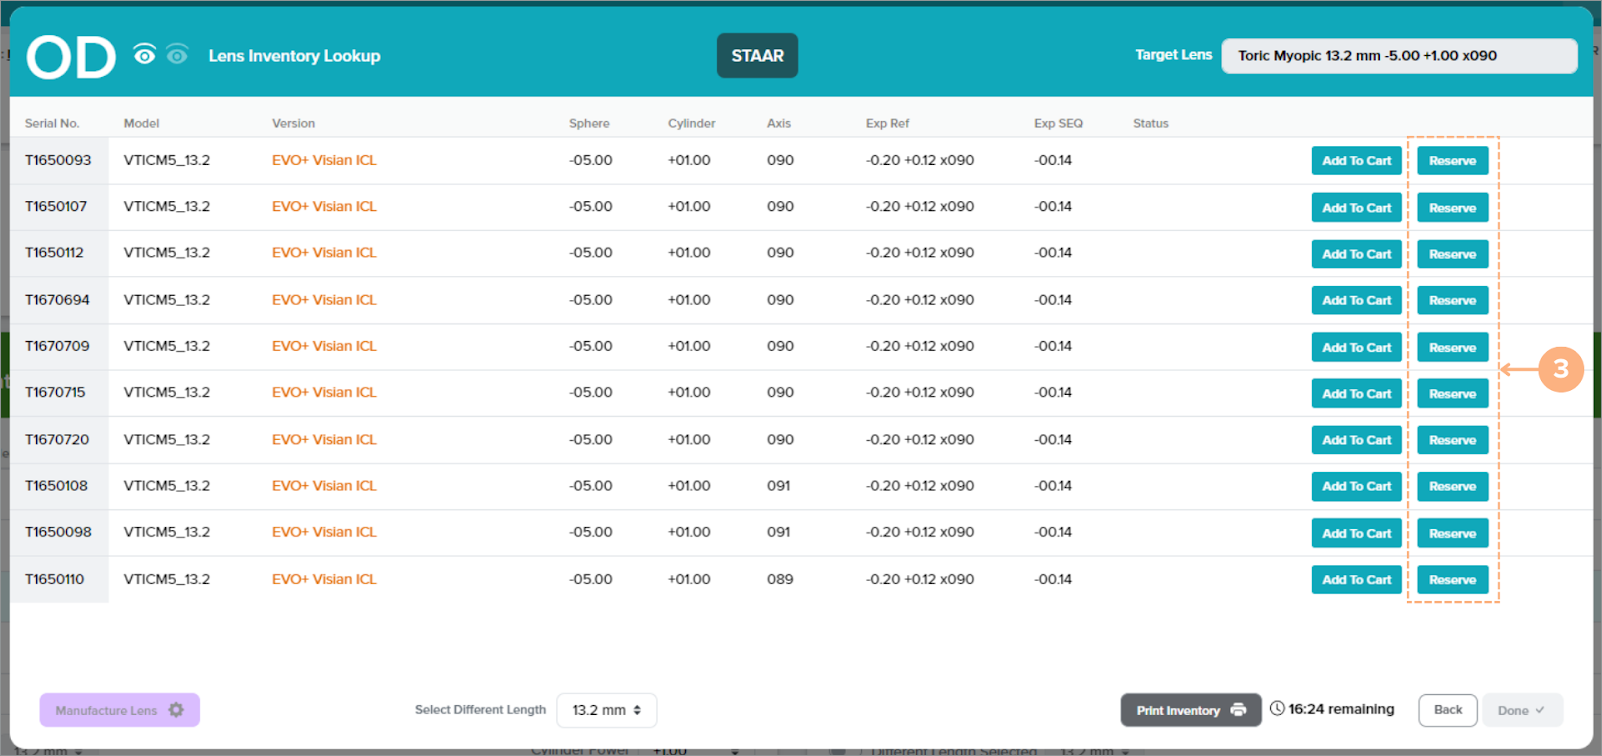
Click on the Reserve button of the desired lens. For Spheric lenses, you will need to select the desired quantity first, then click Reserve.
Multiple Lens Selection Note: For applicable countries, you may be able to select up to two lenses for each operative eye to Reserve.
The Lens Inventory Lookup when the lens selected is Toric:
The Lens Inventory Lookup when the lens selected is Spheric:
After selecting all desired lenses, click on the Done button.
The lens selected for reservation is labeled as “Reserved.”
Note: If you need to remove a lens from your selection, click on the Cancel button of the reserved lens or click the Cancel button next to the Done button to return to the target lens selection screen.
Follow the same steps above if reserving for the other eye.
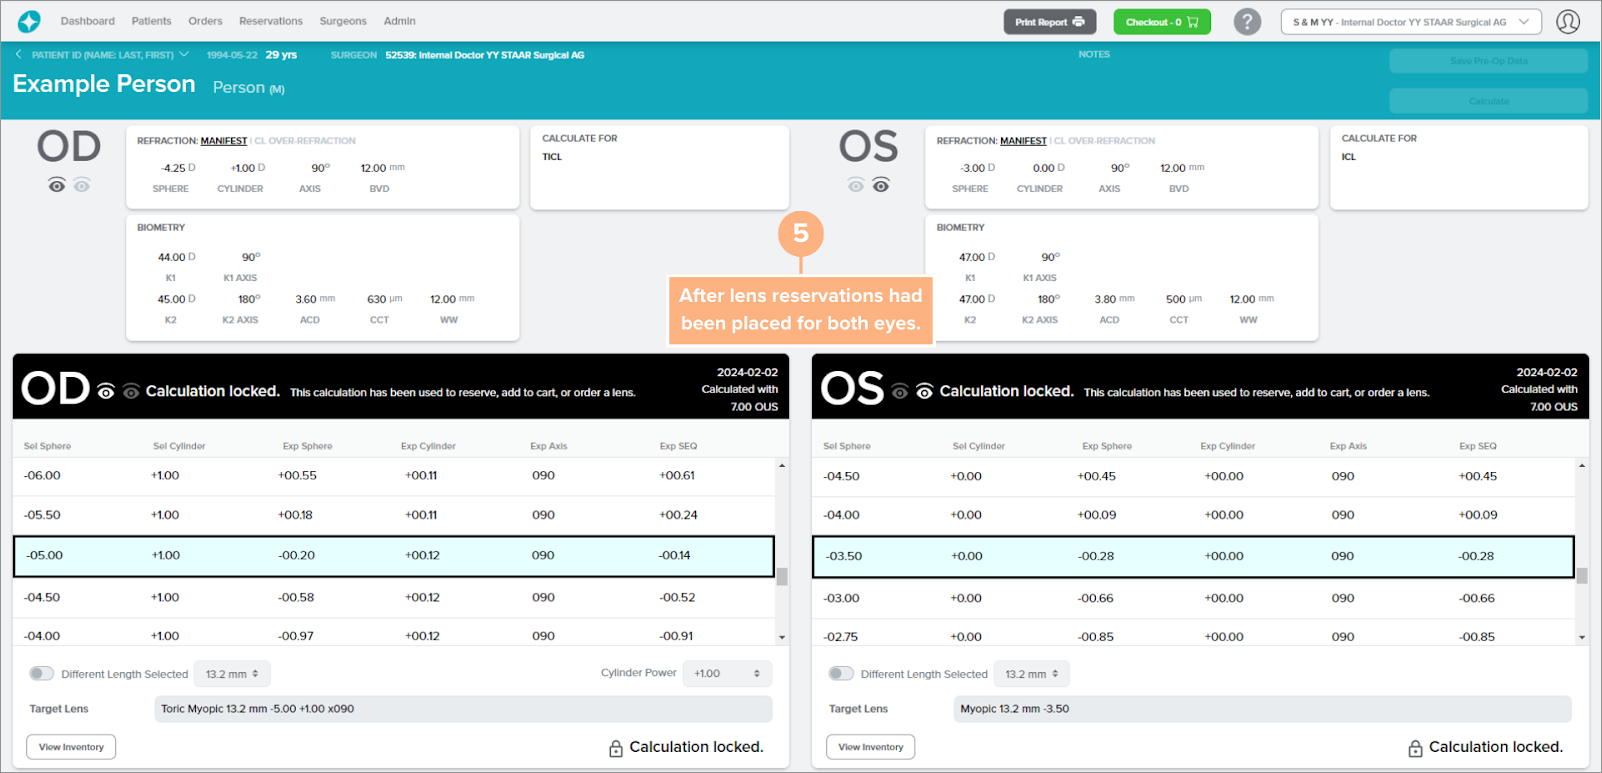
Clicking Done places the reservation and locks the calculation for that operative eye. Once a calculation is locked, you can no longer make changes to the lens calculation. An email reservation confirmation will be sent to you for your placed reservation. The lens will remain in reservation for a period of time based on your region’s agreement. You will also receive reminder emails during the duration of while the lens remains in reserve.
Note: Although the calculation is locked, you can still view the Lens Inventory Lookup screen by clicking on the View Inventory button.
Multiple Lens Selection Note: For applicable countries and accounts, you may be able to select up to two lenses for each operative eye to Reserve, Add to Cart, or Manufacture. If you have not reached the maximum lens limit for an operative eye, you can still select additional lenses to Reserve, Add to Cart, or Manufacture through the View Inventory button.
How to View the Expiration Date of Reservations
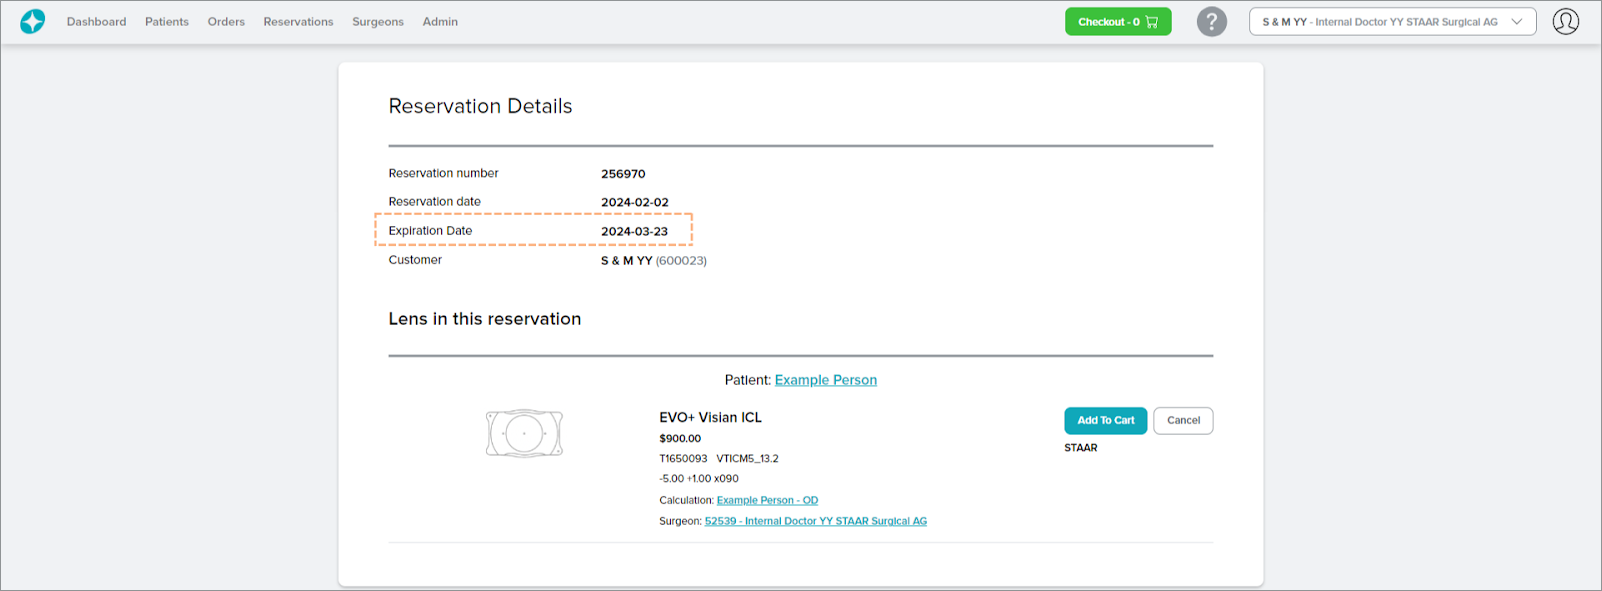
Lens placed for reservation remains in reservation for a period of time based on your region’s agreement. To view the exact expiration date of your lens reservation, refer to the lens Reservation Details page.
The Reservation Details page is accessible by clicking the Reservation Number found in several places:
- Dashboard tab under Reservation notifications
- Patients tab under Order
- Patient Details page under LENS / SURGERY INFO or RESERVATIONS
- Reservations tab
If the reserved lens is not ordered by the expiration date, the reservation will be automatically canceled and the lens will be placed back in the inventory.
How to Add Reserved Lenses to the Shopping Cart
When you are ready to place your lens reservation for order, you can add the reserved lenses to cart from the Reservations tab or Reservation Details page.
Add your Reserved Lens to cart under the Reservation Tab
On the Reservations List, locate the correct reservation. You may utilize the search box and filter button to make your search easier.
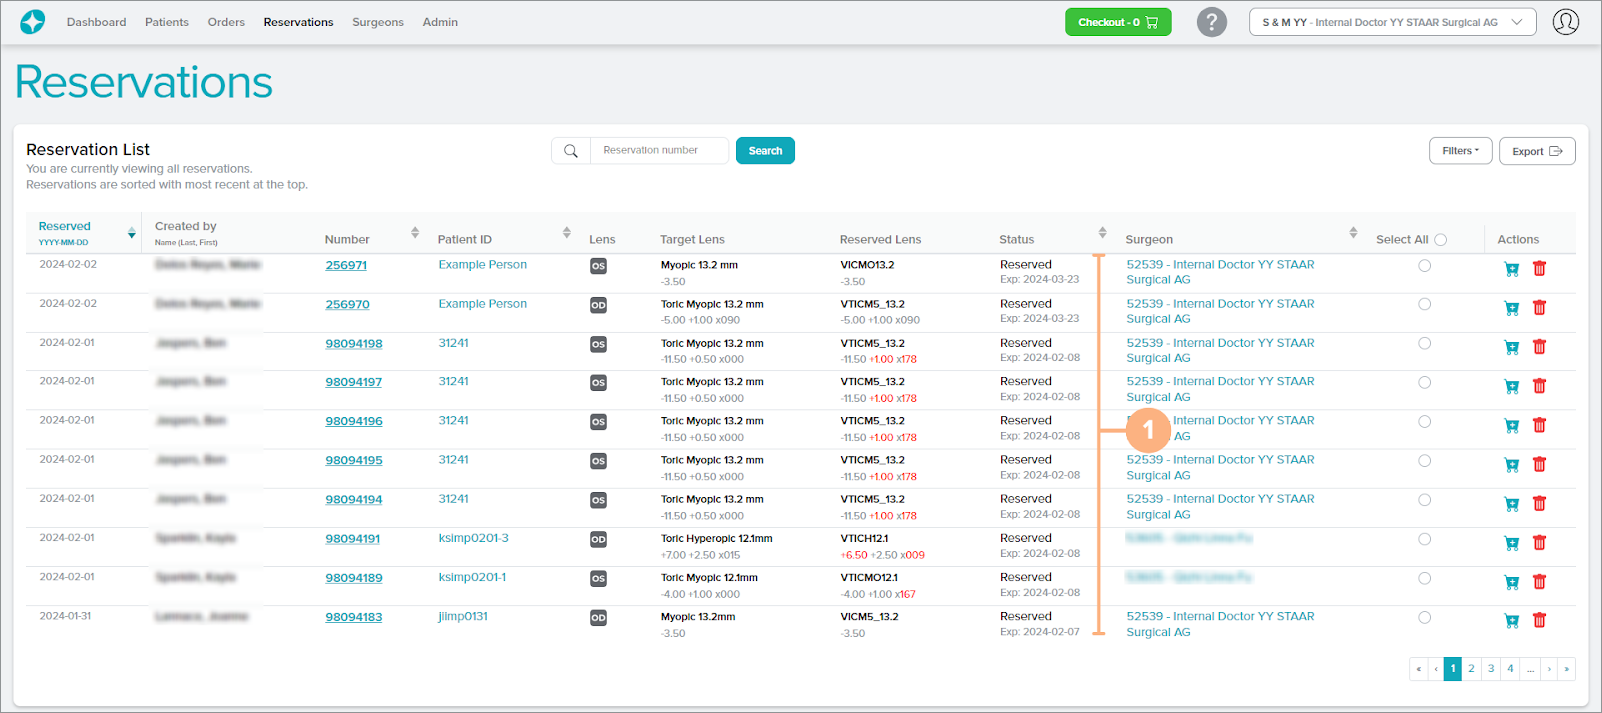
Under Actions, click on the Add to cart (blue shopping cart) button.
You may also select multiple lenses to add to cart at once by using the Select All tool. The status for the reserved lens placed in the shopping cart is now labeled as “In Cart.”
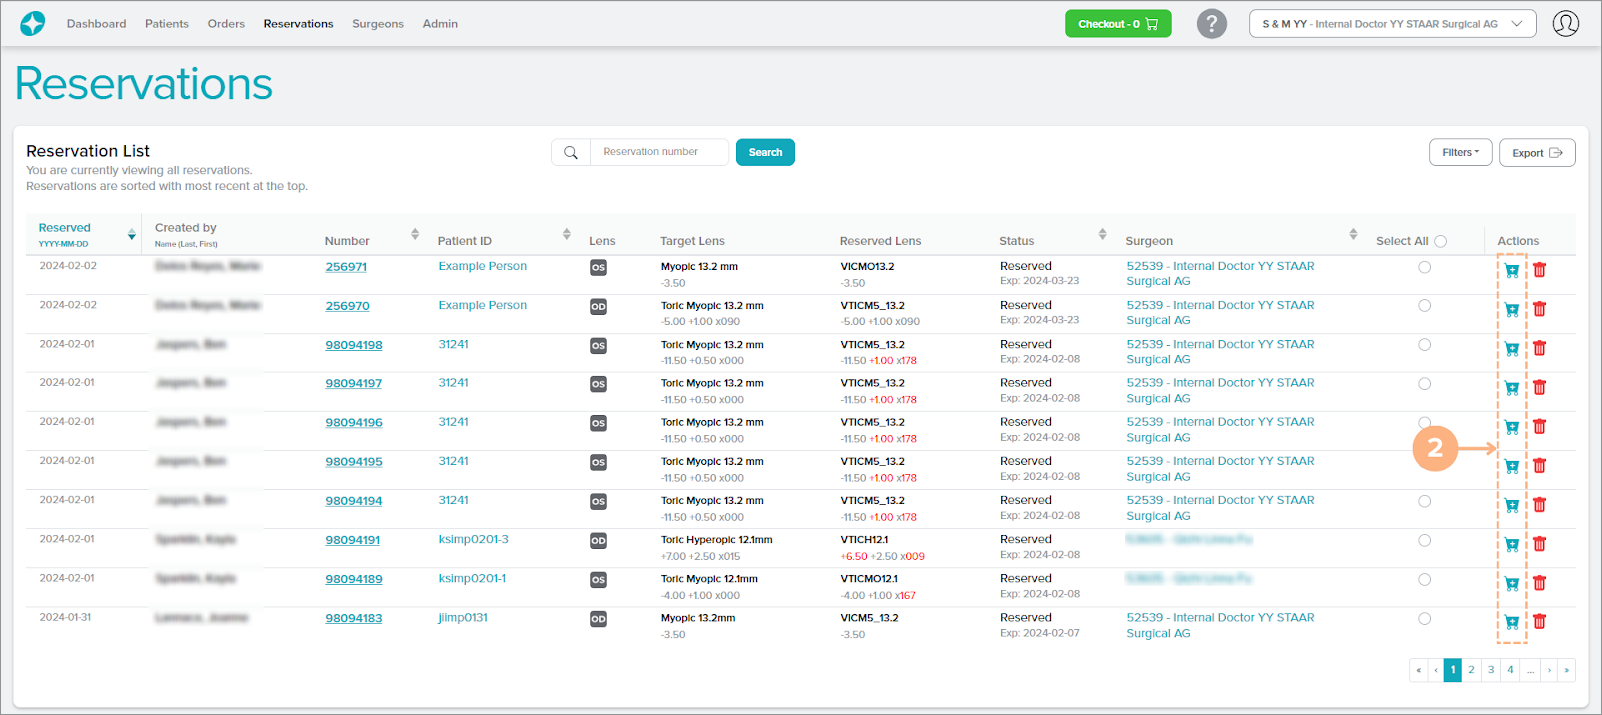
The shopping cart automatically populates with the reserved lenses that you added to the cart. To proceed to the shopping cart, refer to How to Access the Shopping Cart. Then to checkout, refer to How to Checkout your Lenses. For surgeons who order through a distributor, to place the lenses in your shopping cart for pre-order, refer to Surgeons Who Order Through a Distributor: How to Place Pre-Orders.
Add your Reserved Lens to Cart under the Reservation Details Page
Verify that the lens listed is the correct lens in the reservation that you would like to add to cart.
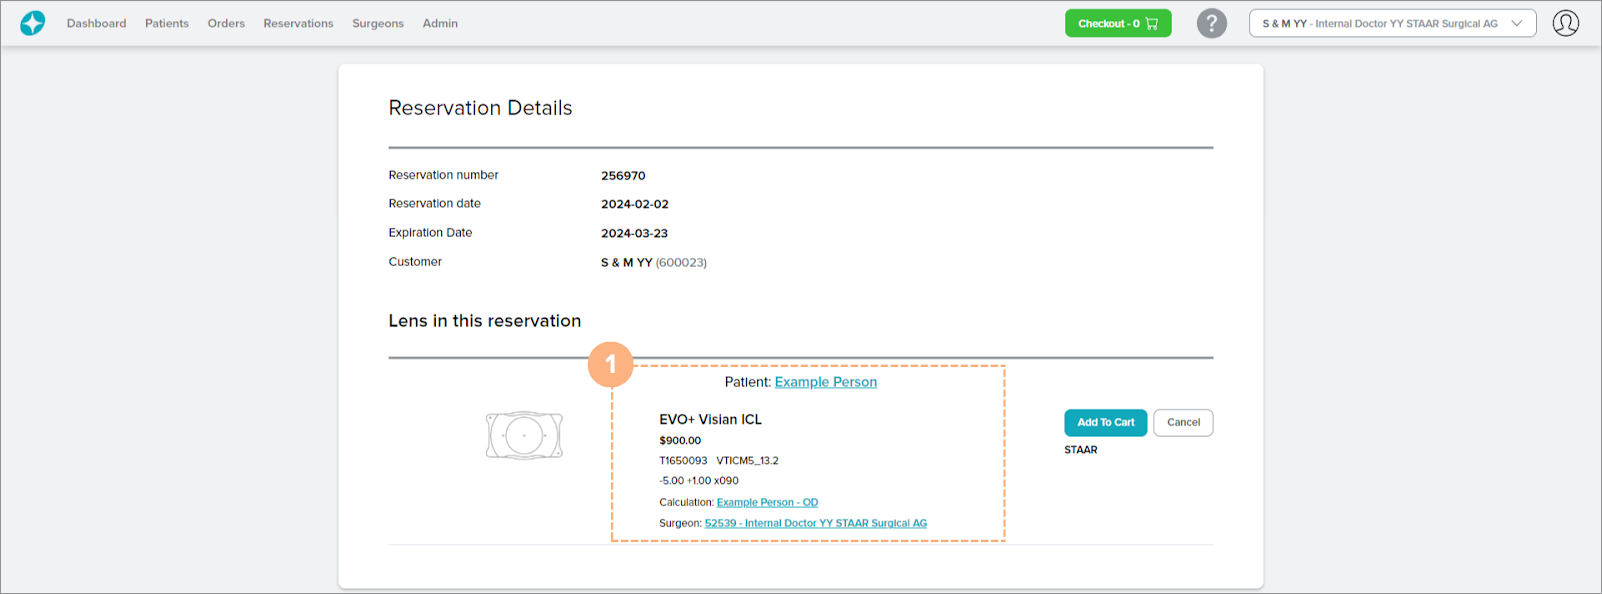
Click on the Add To Cart button.
The status for the reserved lens placed in the shopping cart is labeled as “In Cart.”
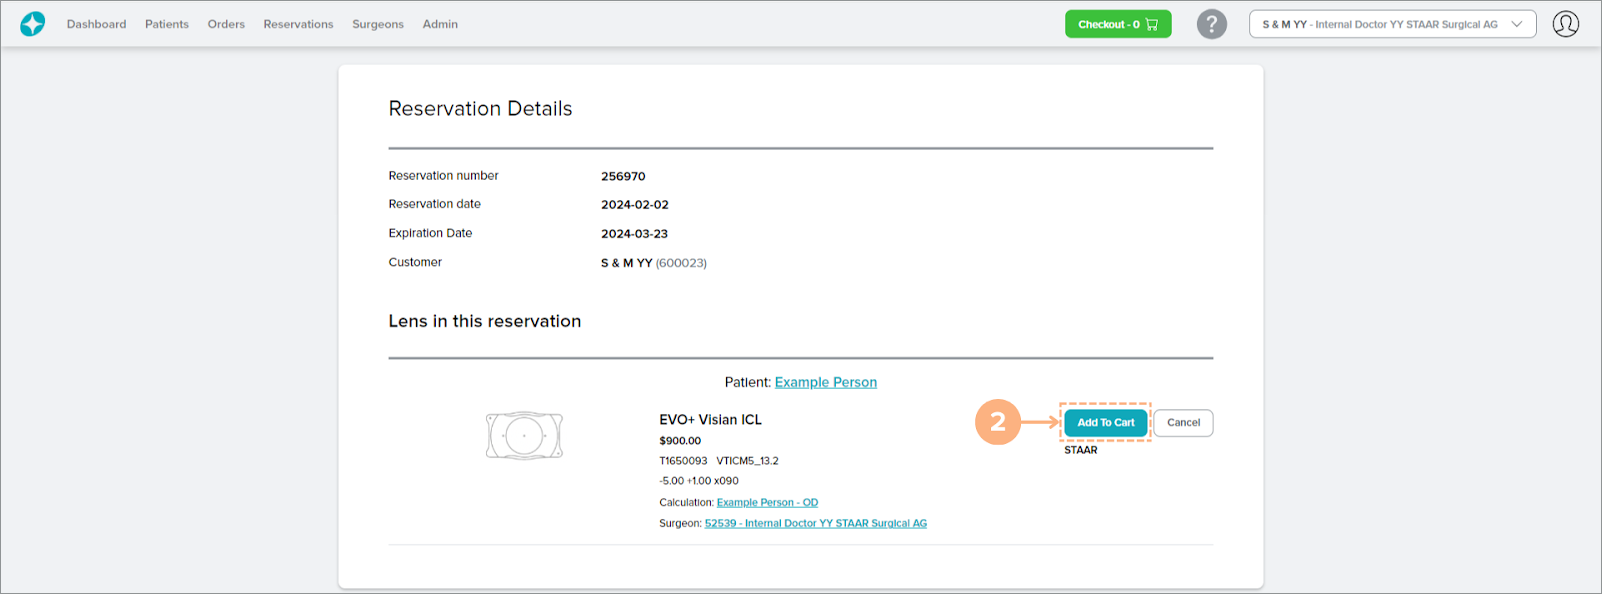
The shopping cart automatically populates with the reserved lens that you added to the cart. To proceed to the shopping cart, refer to How to Access the Shopping Cart. Then to checkout, refer to How to Checkout your Lenses. For surgeons who order through a distributor, to place the lenses in your shopping cart for pre-order, refer to Surgeons Who Order Through a Distributor: How to Place Pre-Orders.
How to Cancel Lens in Reservation
If you are no longer interested in ordering a reserved lens, you can cancel the lens in reservation from the Reservations tab or the Reservation Details page.
Cancel Reserved Lens under the Reservations Tab
On the Reservations List, locate the correct reservation. You may utilize the search box and filter button to make your search easier.
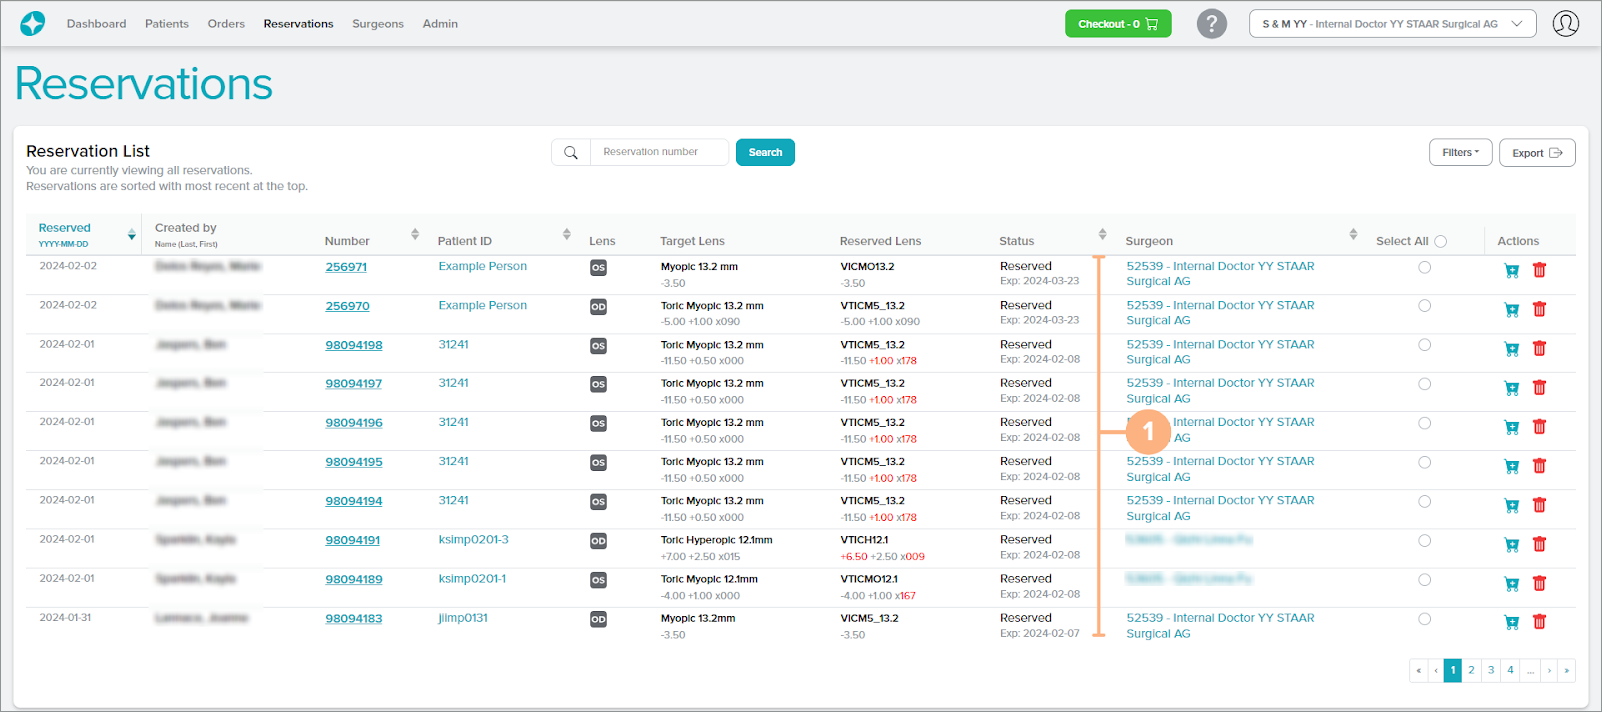
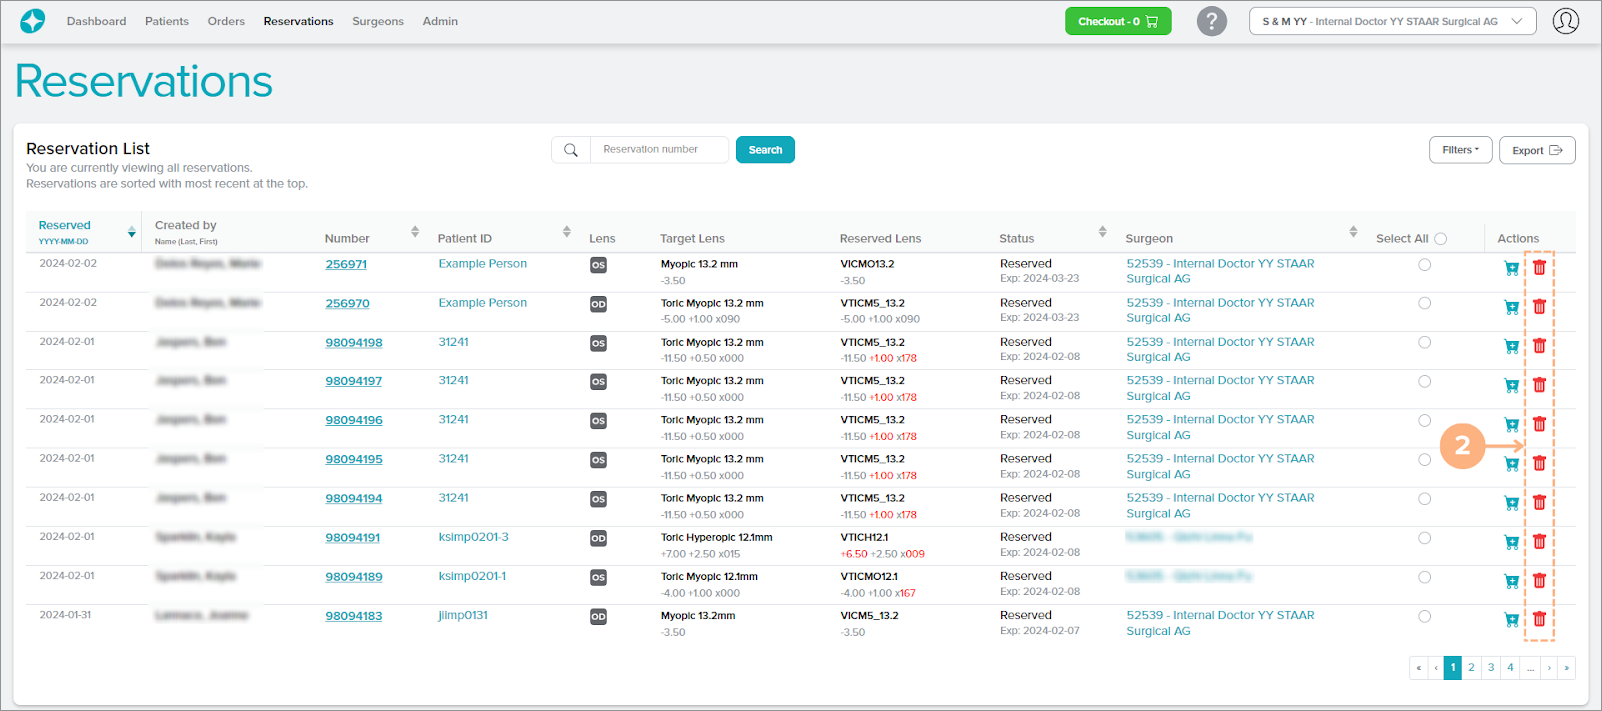
Under Actions, click on the Cancel reservation (red trash can) button.
You may also select multiple lenses to cancel at once by using the Select All tool.
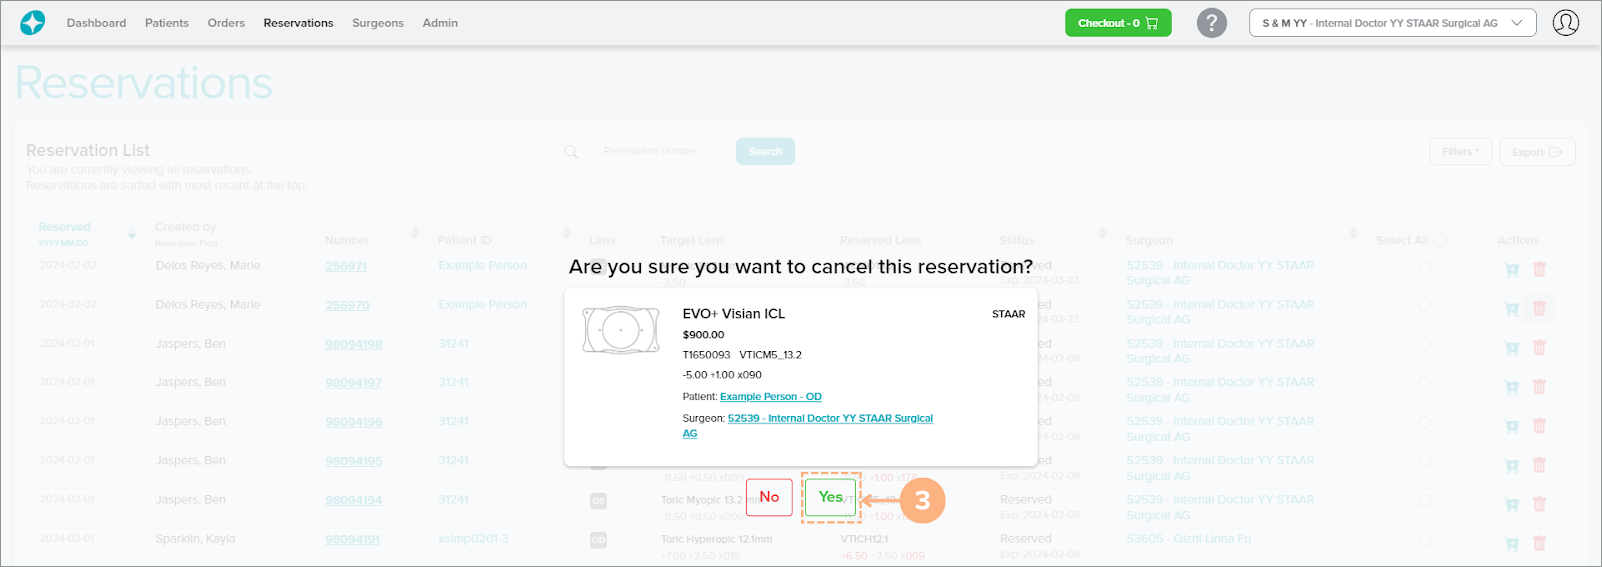
Verify that the lens or quantity listed is the correct lens in reservation that you would like to cancel. Click “Yes” to confirm the cancelation.
Note: To abandon the cancelation, click “No.”
The canceled lens is removed from the Reservations List. However, you may view the canceled reservation history by clicking on the Filters button, toggling on “Show Canceled,” and clicking “Apply” for the filters. The patient’s full reservation history is also accessible on the Patient Details page under RESERVATIONS.
Cancel Reserved Lens under the Reservation Details Page
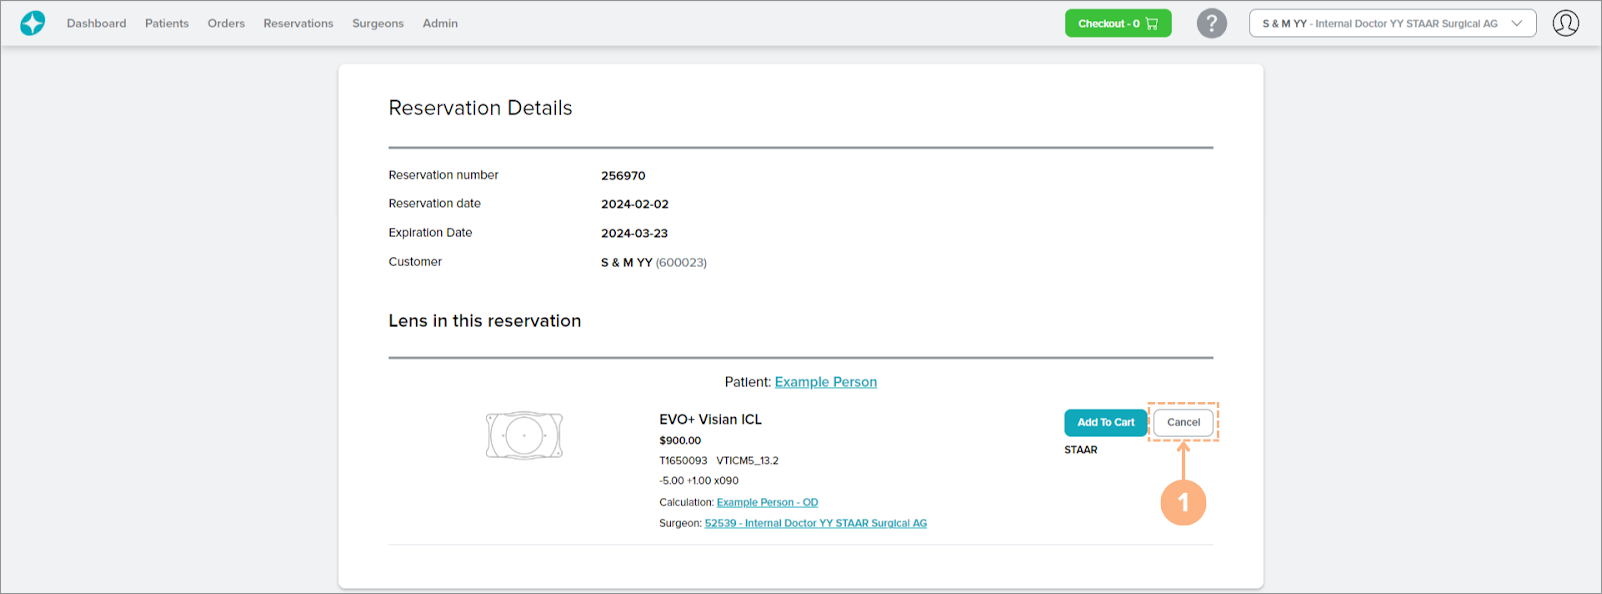
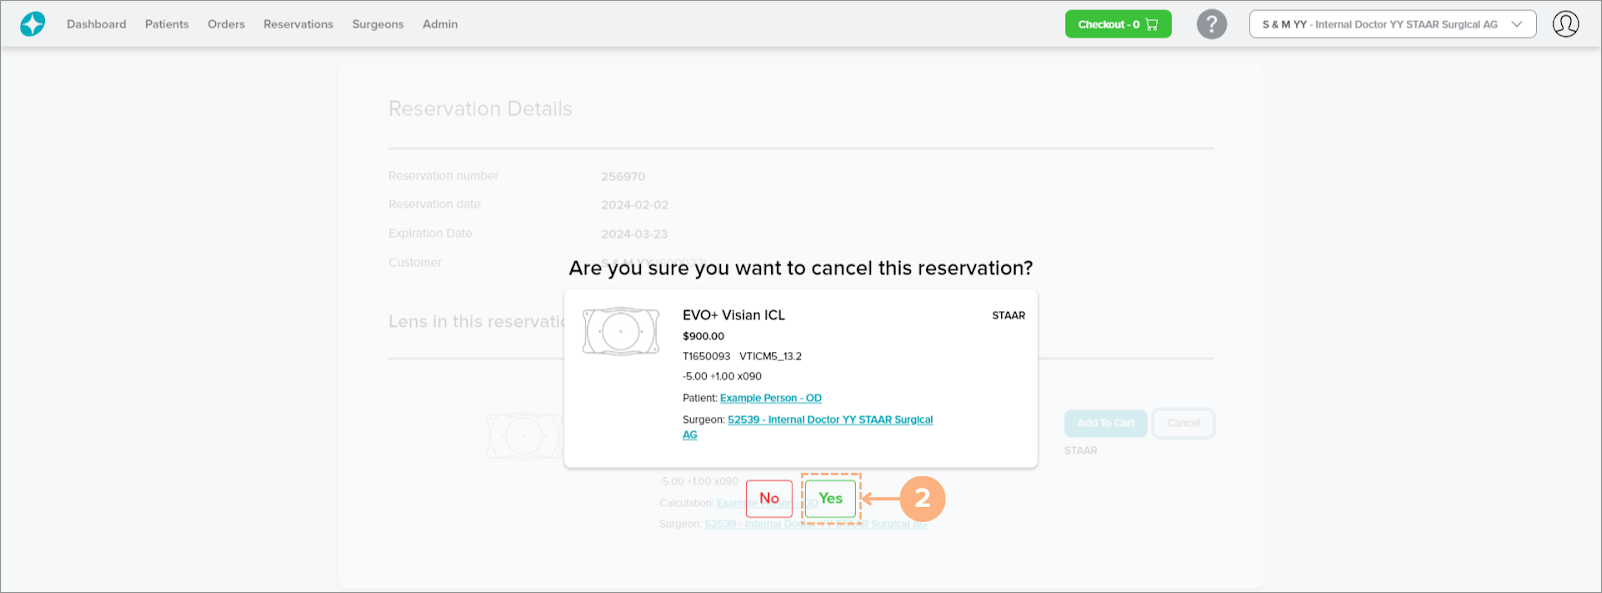
On the Reservations Details page, click on the Cancel button.
Verify that the lens listed is the correct lens in reservation that you would like to cancel. Click “Yes” to confirm the cancelation.
Note: To abandon the cancelation, click “No.”
The lens in reservation is marked as “Canceled” on the Reservation Details page. The patient’s full reservation history is accessible on the Patient Details page under RESERVATIONS.
How to Add Lenses to the Shopping Cart
After selecting and saving a target lens from the target lens selection screen, you can access the Inventory Lookup and select a lens to Add to Cart, Reserve, or Manufacture.
If you are ready to order a lens for purchase, you may add lenses to the shopping cart:
Click on the Inventory Lookup button. You may view the inventory lookup for either eye, one at a time (if applicable).
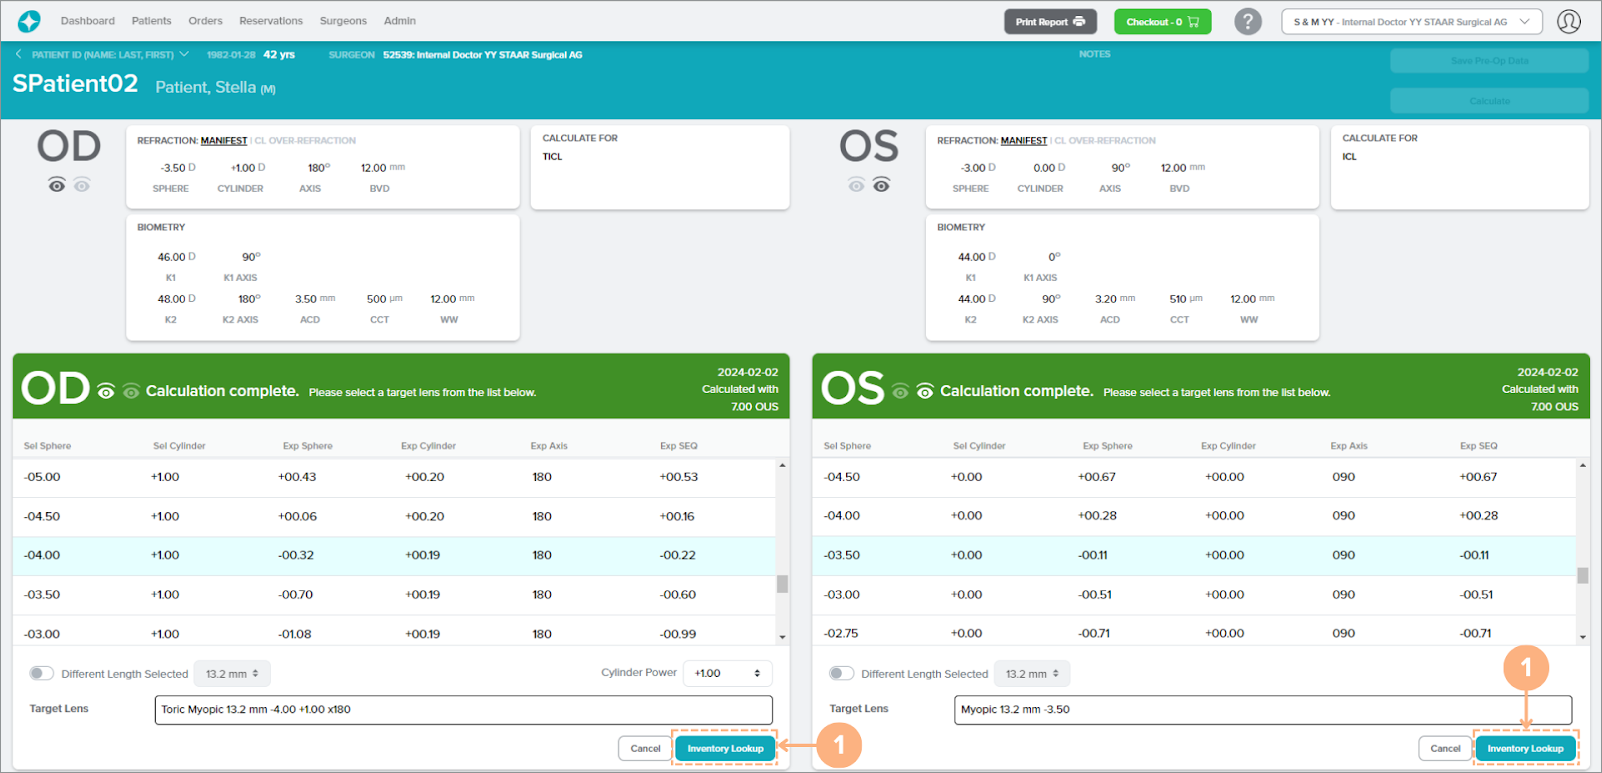
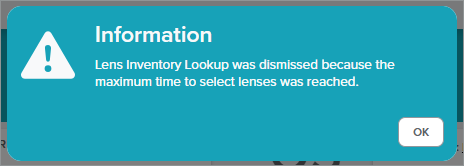
You have 20 minutes to select the lenses to add to cart from the Inventory Lookup screen. If the selection is not completed within that time, the lens inventory lookup screen will clear and you will be returned to the Target Lens Selection screen with the message indicated below.
Confirm or select a different target lens length. To change the target lens length selection, click on the Select Different Length drop-down button and select the desired length.
Note: A recommended target lens length is automatically selected but you may change this selection. If a different target lens length is selected, a new set of lenses with the new calculated powers and expected post-op outcomes will be displayed.
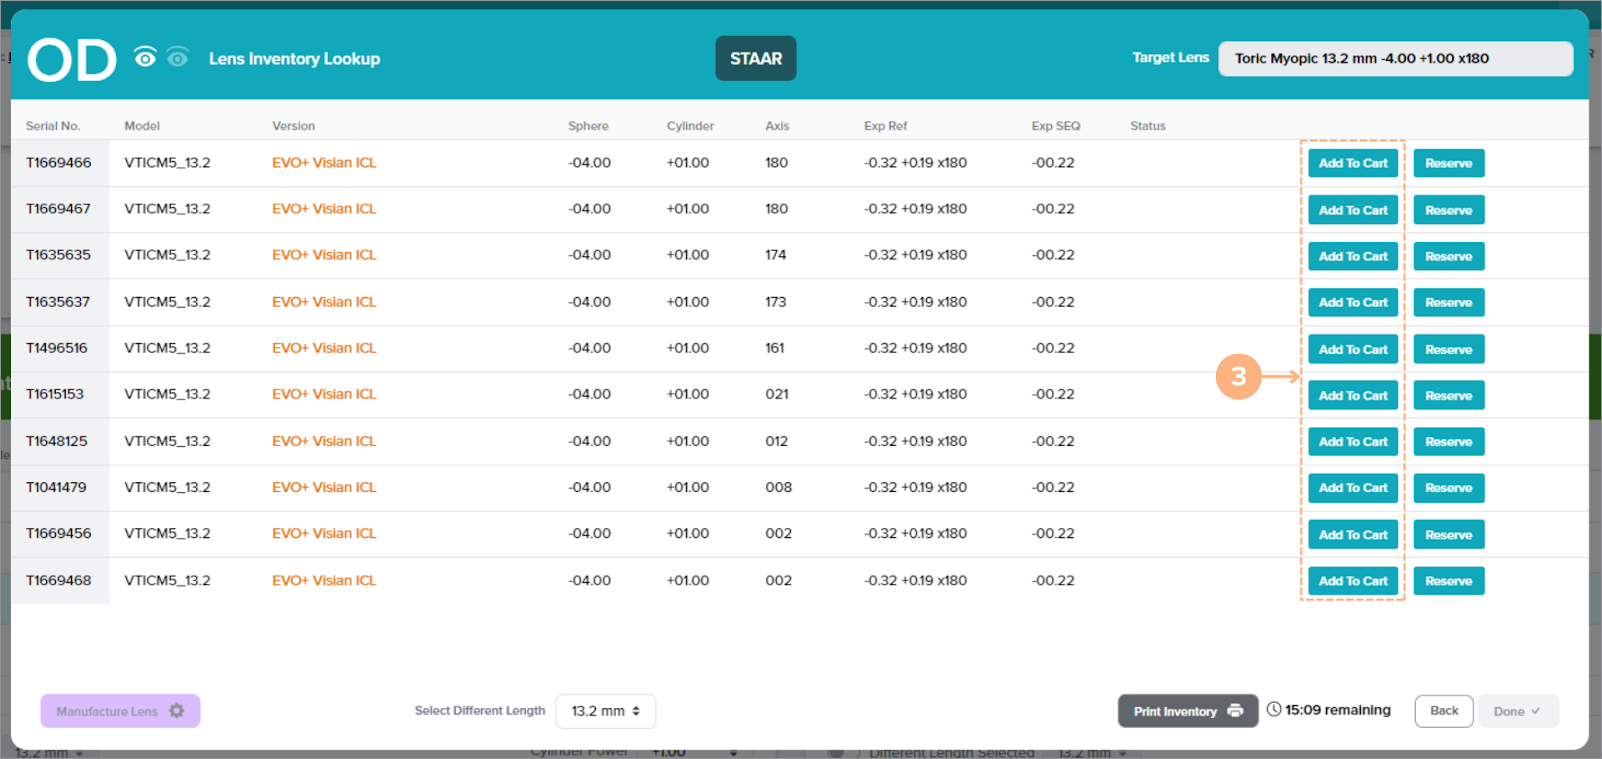
Lens Inventory Lookup Note: For Toric lenses, the real-time Lens Inventory Lookup screen displays a list of up to 10 available lenses within a half-diopter of the desired sphere or cylinder with the lens powers and predicted postoperative outcomes. The lens closest to your Target Lens is displayed at the top of the list.
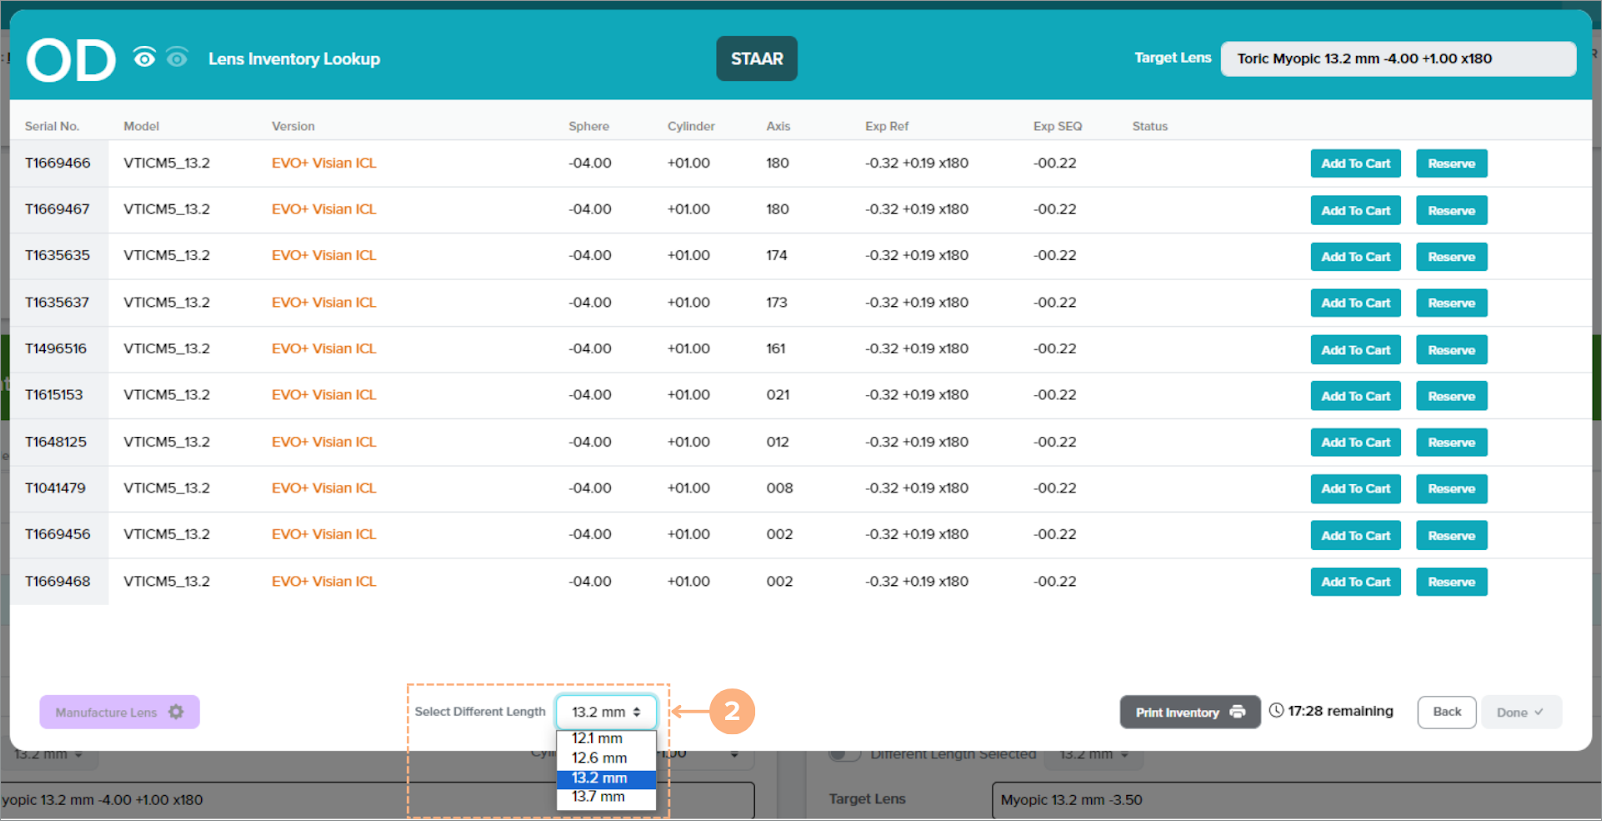
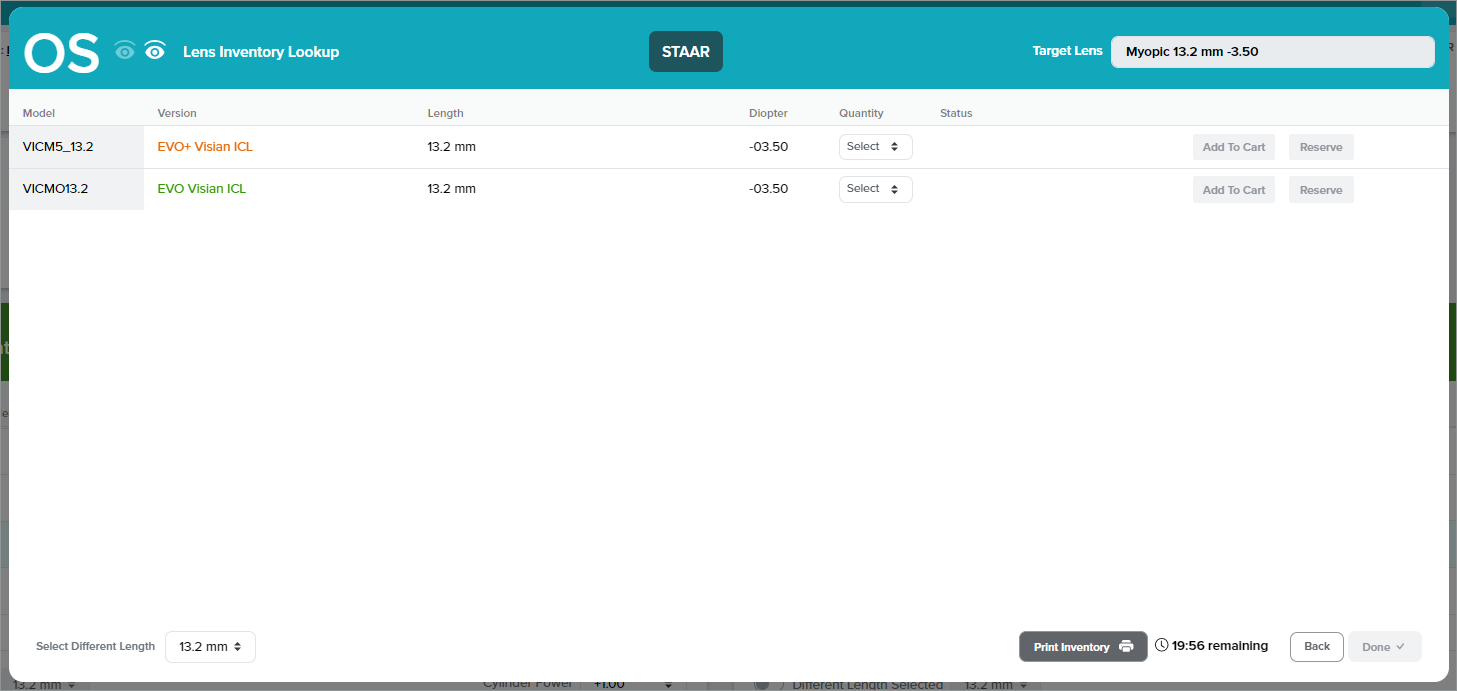
Click on the Add To Cart button of the desired lens. For Spheric lenses, you will need to select the desired quantity first, then click Add to Cart.
The lens is labeled as “In Cart.”
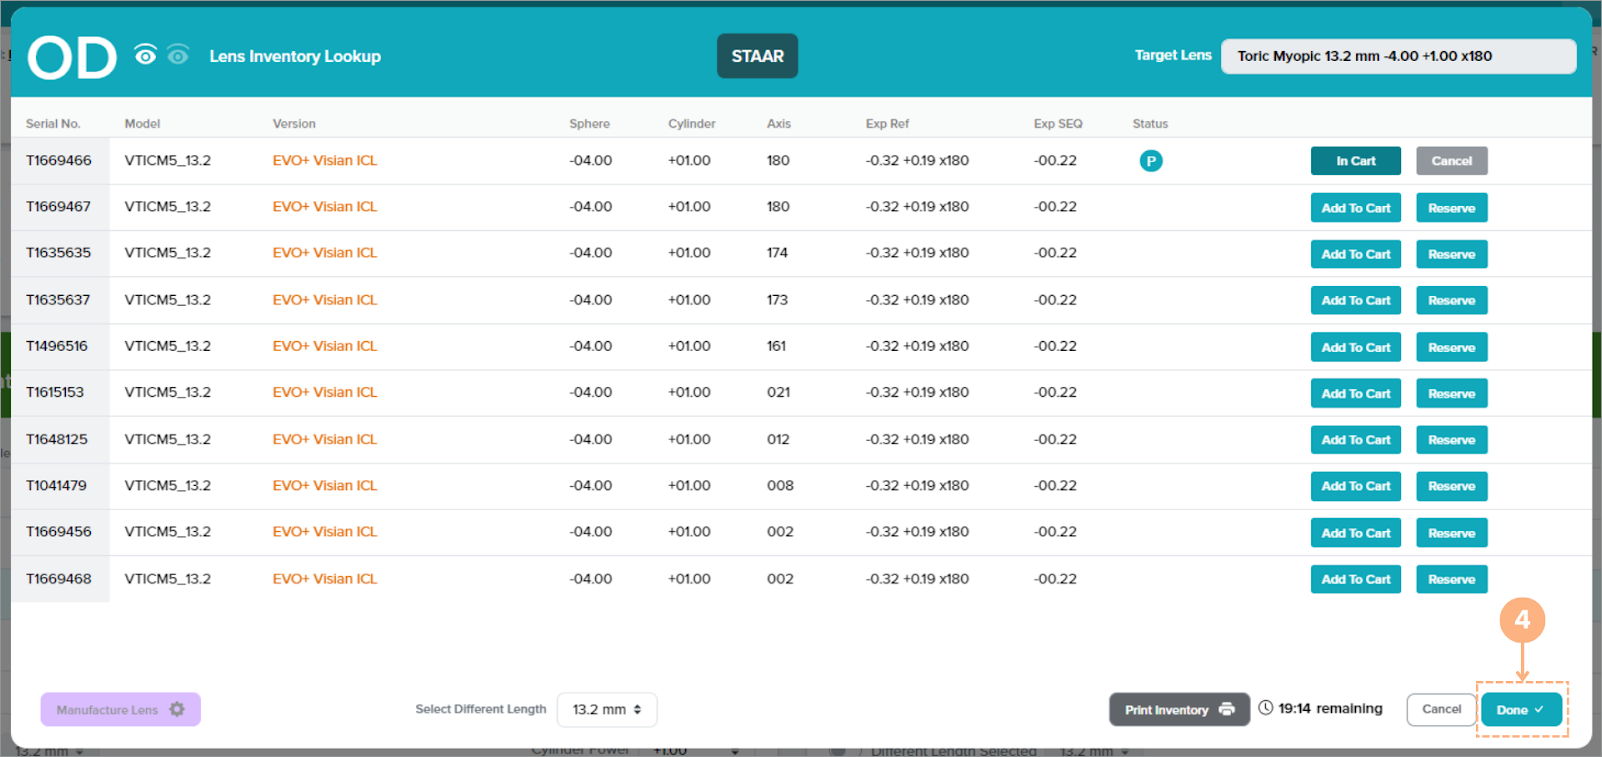
Multiple Lens Selection Note: For applicable countries, you may be able to select up to two lenses for each operative eye to Add To Cart. The first lens you select is the primary lens. Under the Status of the lens, this is indicated with the letter P. You can add one more lens to the cart as an additional/backup lens.
The Lens Inventory Lookup when the lens selected is Toric:
The Lens Inventory Lookup when the lens selected is Spheric:
After selecting all desired lenses for the shopping cart, click on the Done button.
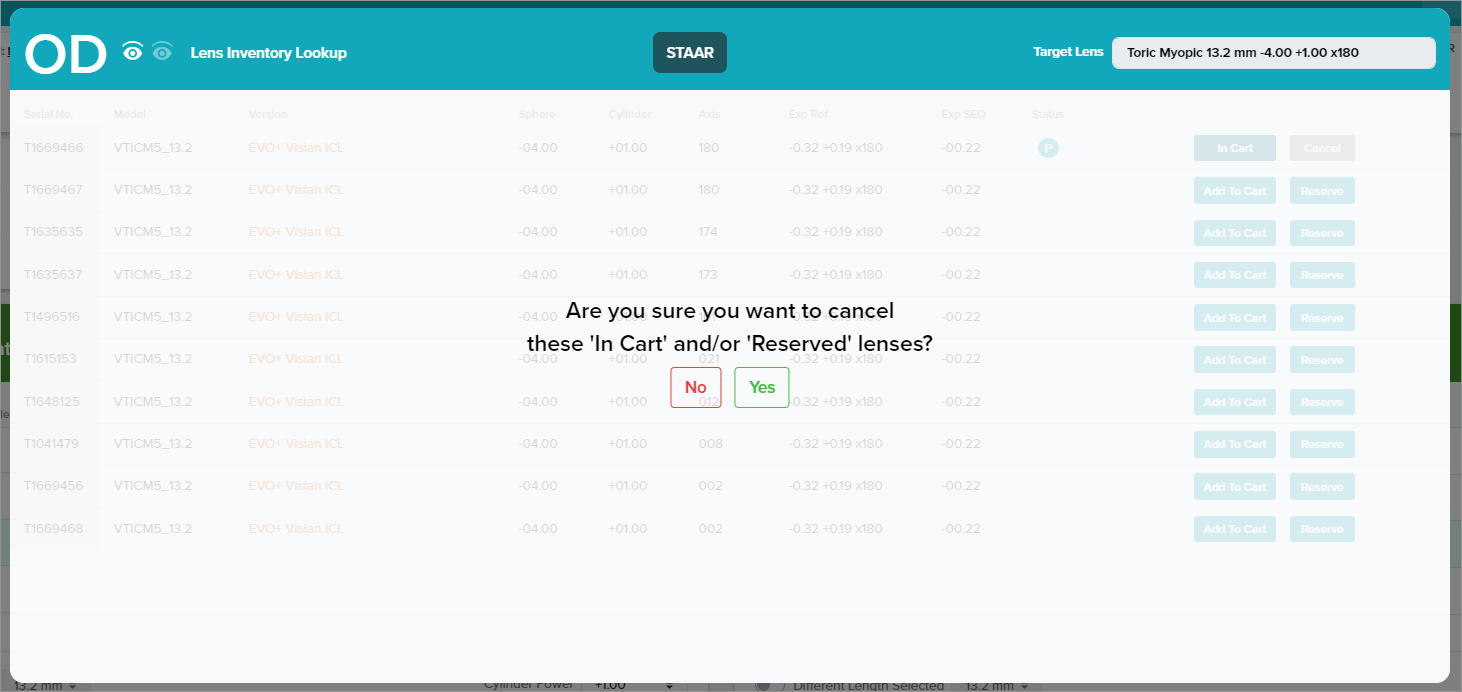
Note: If you need to remove a lens from your selection, click on the Cancel button of the In Cart lens or click the Cancel button next to the Done button to return to the target lens selection screen.
When you click on the Cancel button next to the Done button when you have lenses “In Cart” or “Reserved,” you will need to confirm that you would like to cancel and exit the Lens Inventory Lookup.
Follow the same steps above if placing lenses to add to cart for the other eye.
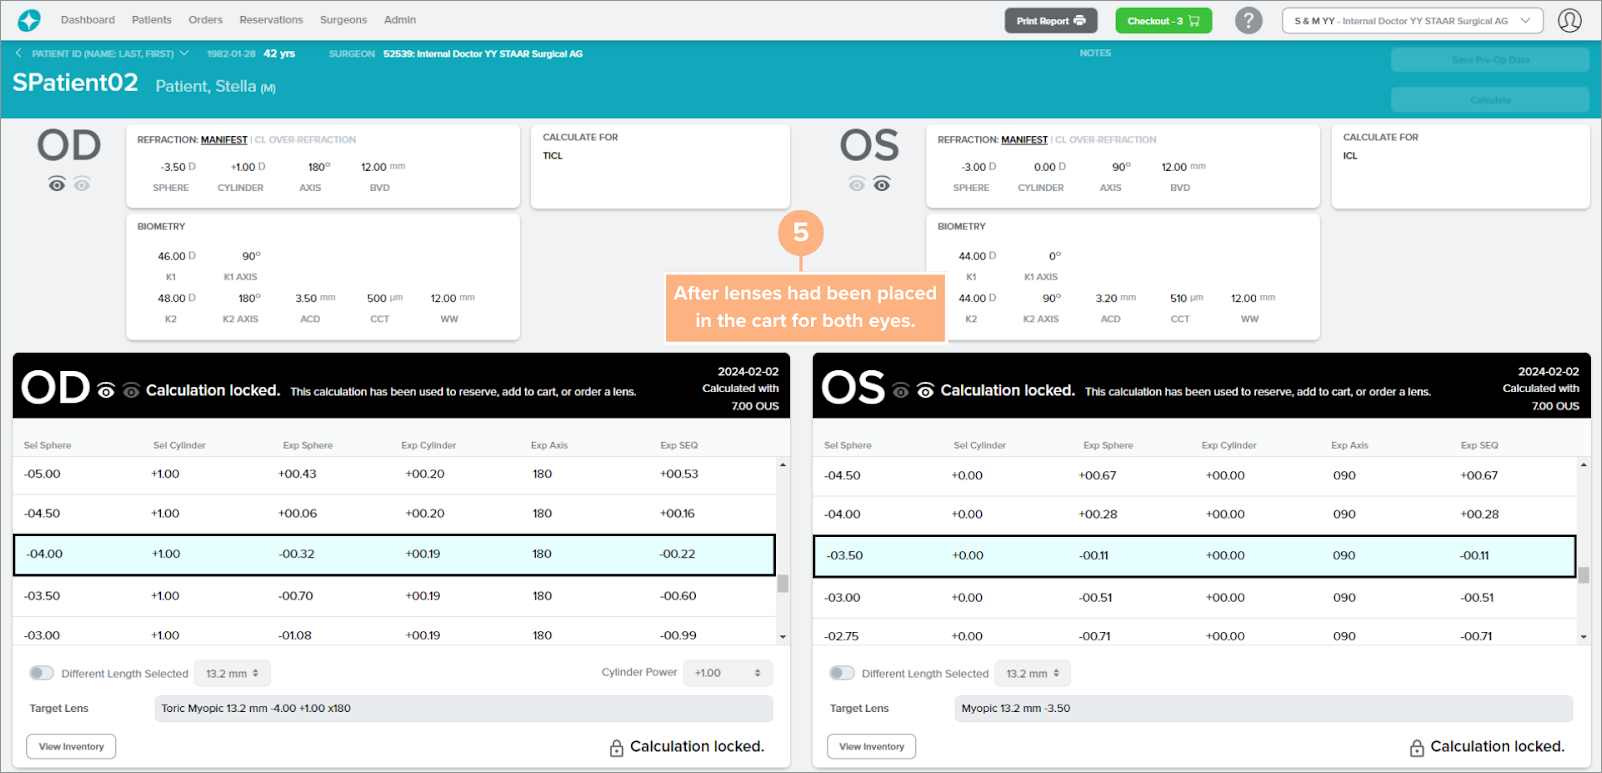
Clicking Done places the lens in the shopping cart and locks the calculation for that operative eye. Once a calculation is locked, you can no longer make changes to the lens calculation. Although the calculation is locked, you can still view the Lens Inventory Lookup screen by clicking on the View Inventory button.
The shopping cart automatically populates with the lenses that you added to the cart. To proceed to the shopping cart, refer to How to Access the Shopping Cart. Then to checkout, refer to How to Checkout your Lenses. For surgeons who order through a distributor, to place the lenses in your shopping cart for pre-order, refer to Surgeons Who Order Through a Distributor: How to Place Pre-Orders.
Multiple Lens Selection Note: For applicable countries and accounts, you may be able to select up to two lenses for each operative eye, to reserve, add to cart, or manufacture. If you have not reached the maximum lens limit for an operative eye, you can still select additional lenses to Reserve, Add to Cart, or Manufacture through the View Inventory button.
How to Manufacture Lenses
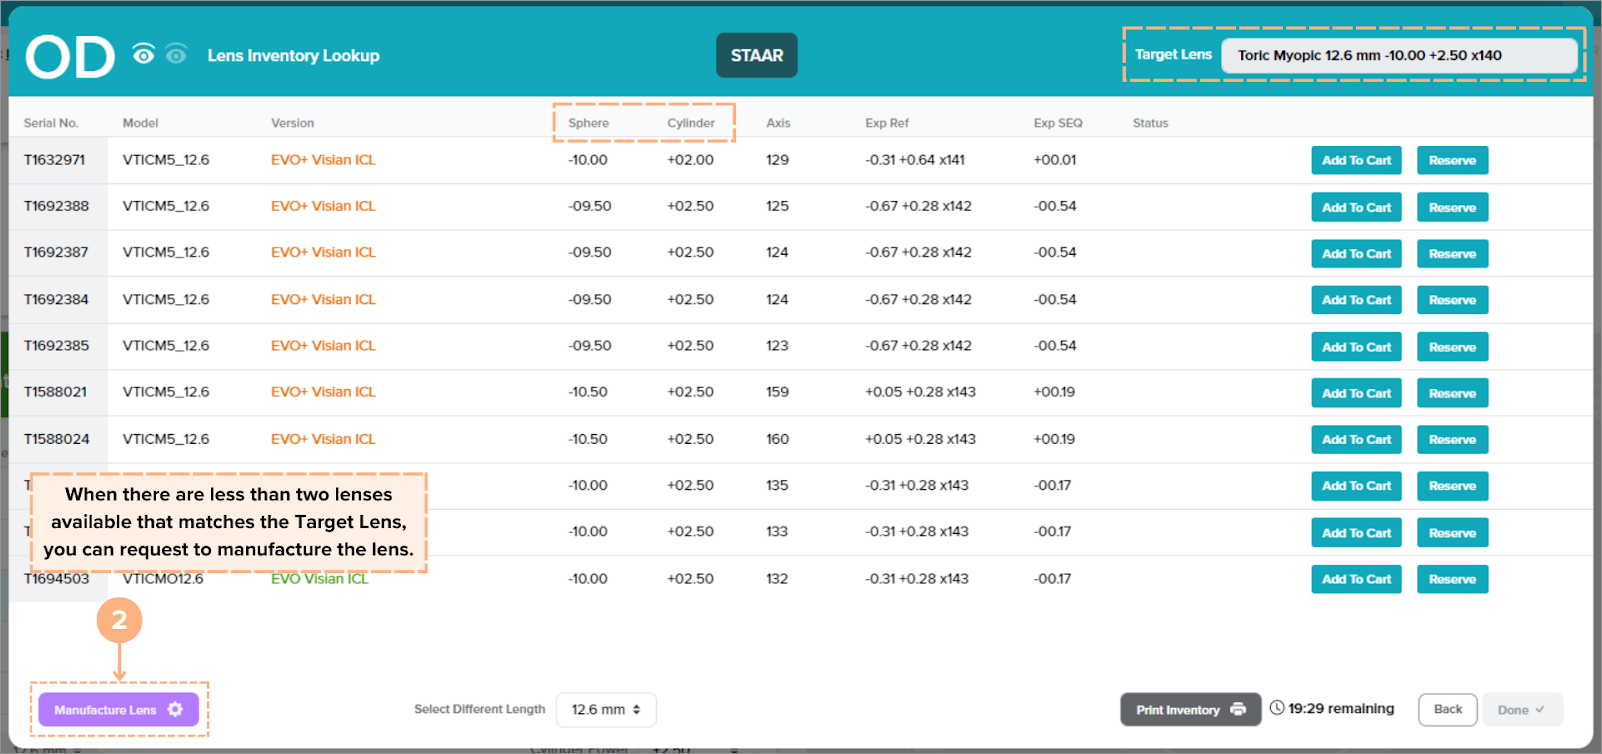
After selecting and saving a target lens from the target lens selection screen, you can access the Inventory Lookup and select a lens to Manufacture, Add to Cart, or Reserve. On the Lens Inventory Lookup screen, when less than two lenses are available in the inventory that match the Target Lens, you can manufacture the Target Lens. Otherwise, the Manufacture Lens button is not available. Only Toric lenses may be manufactured, and not Spheric lenses.
To manufacture Toric lenses:
Click on the Inventory Lookup button.
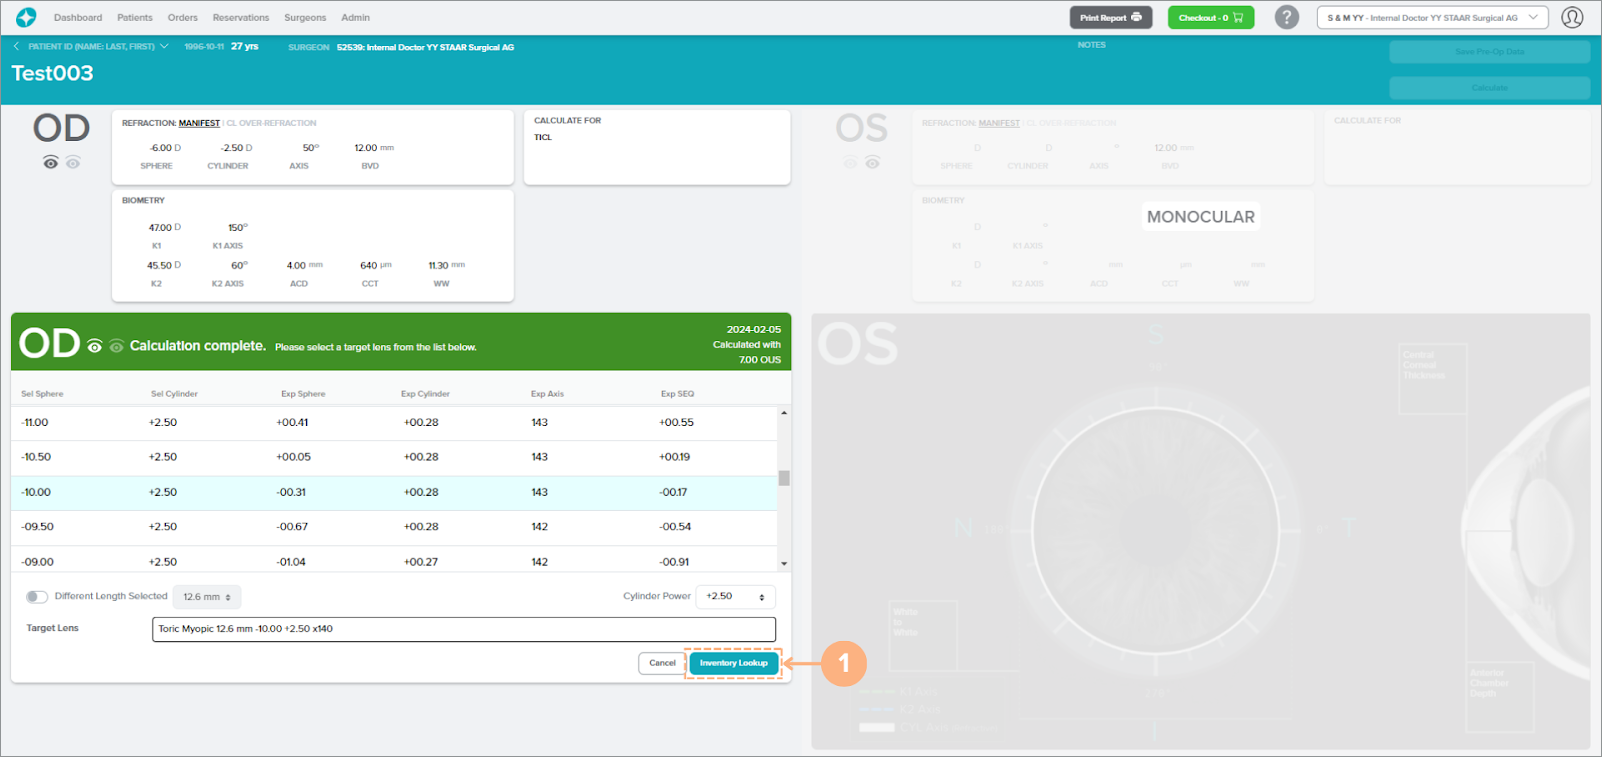
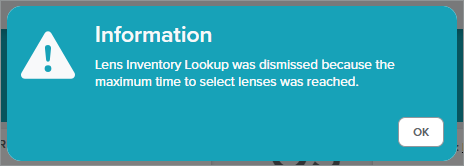
You have 20 minutes to select the lenses to manufacture from the Inventory Lookup screen. If the selection is not completed within that time, the lens inventory lookup screen will clear and you will be returned to the Target Lens Selection screen with the message indicated below.
For applicable lenses to manufacture, click on the Manufacture Lens button.
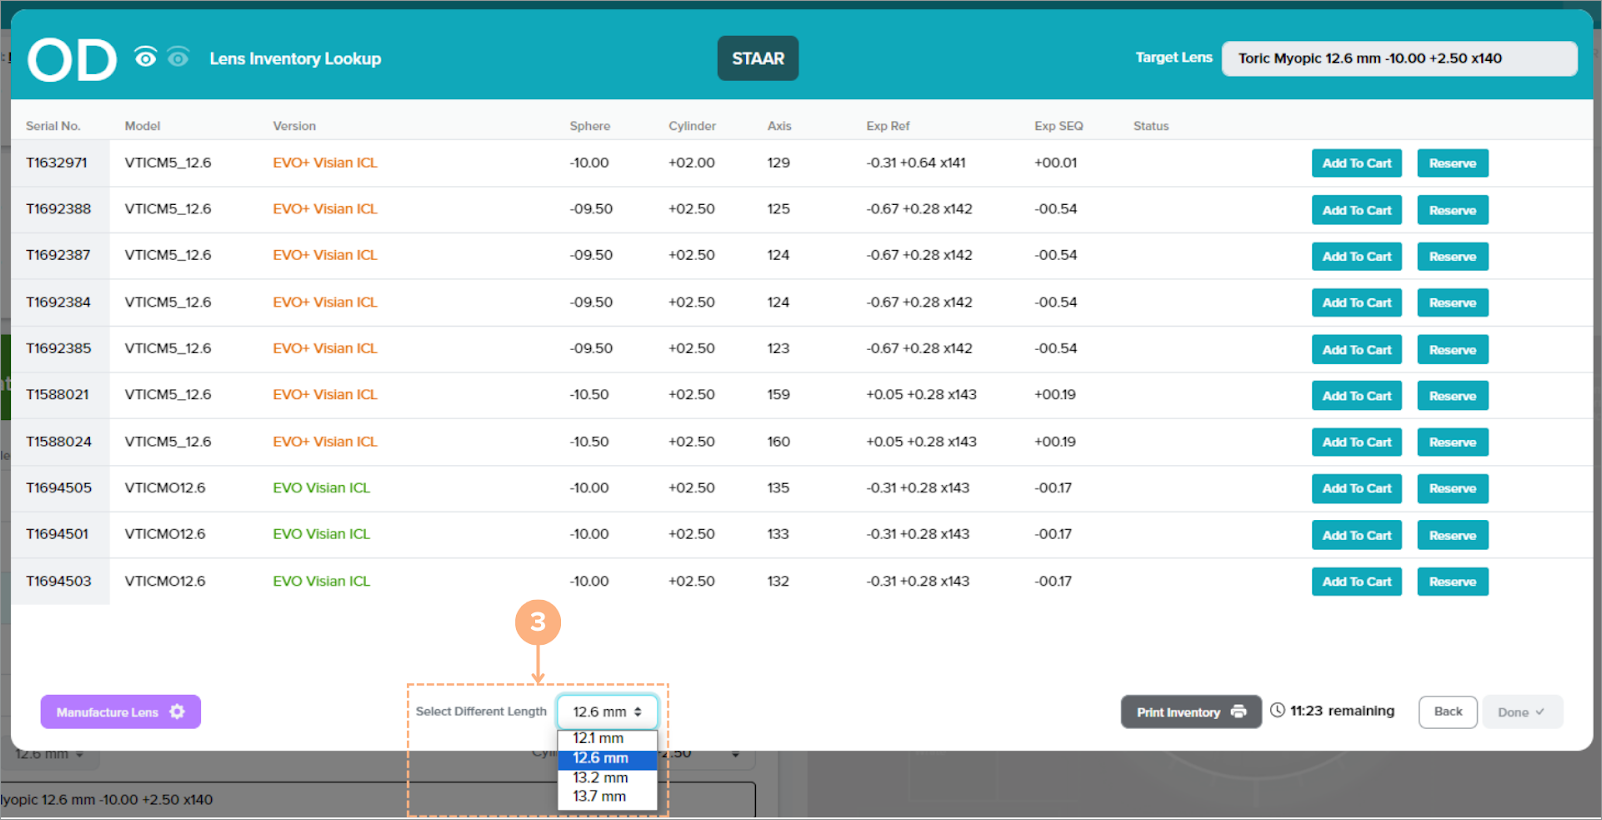
Confirm or select a different target lens length. To change the target lens length selection, click on the Select Different Length drop-down button and select the desired length.
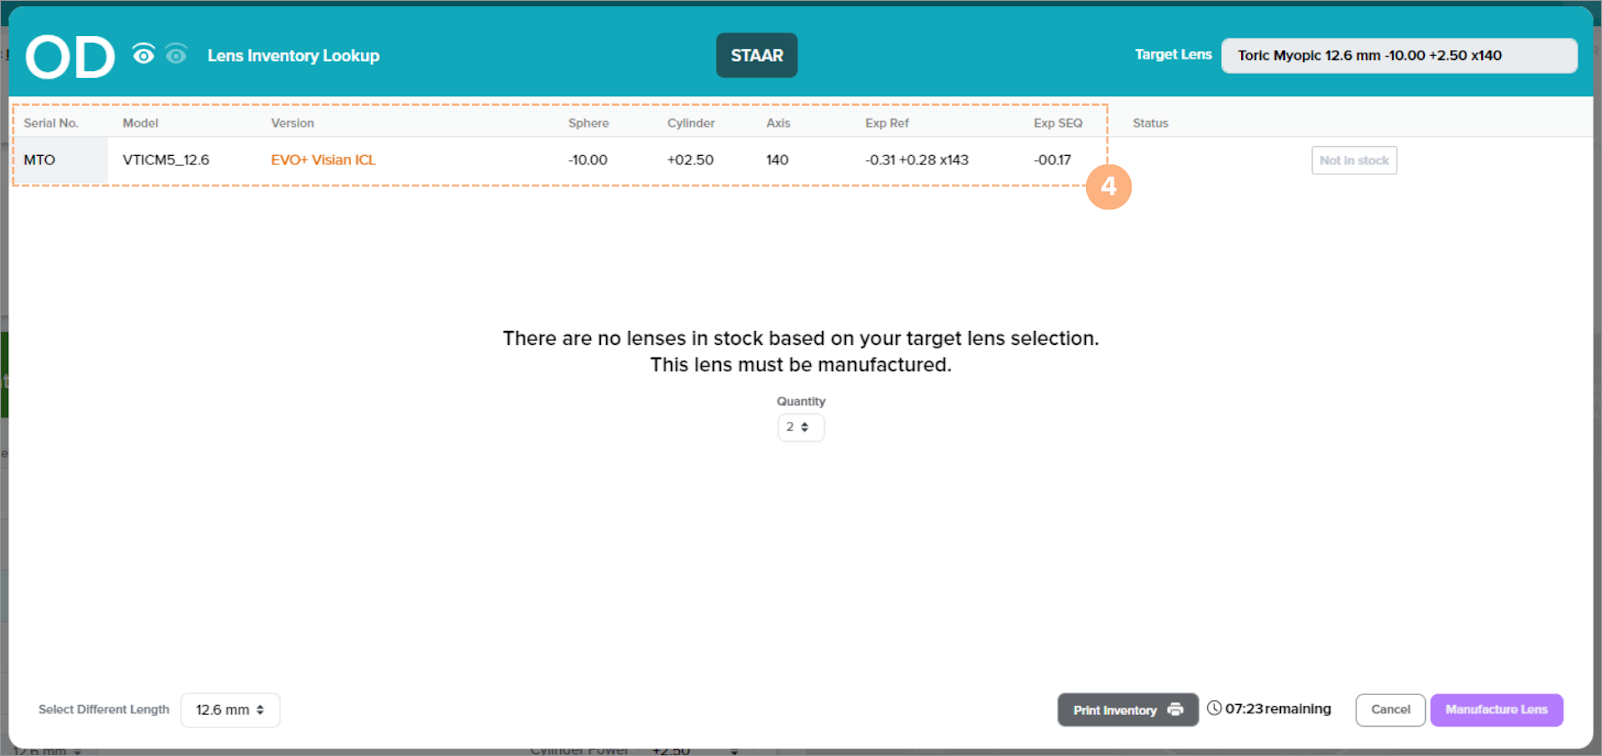
Confirm the lens listed is the desired lens you would like manufactured.
Note: Axis of 180 is the same as an Axis of 0.
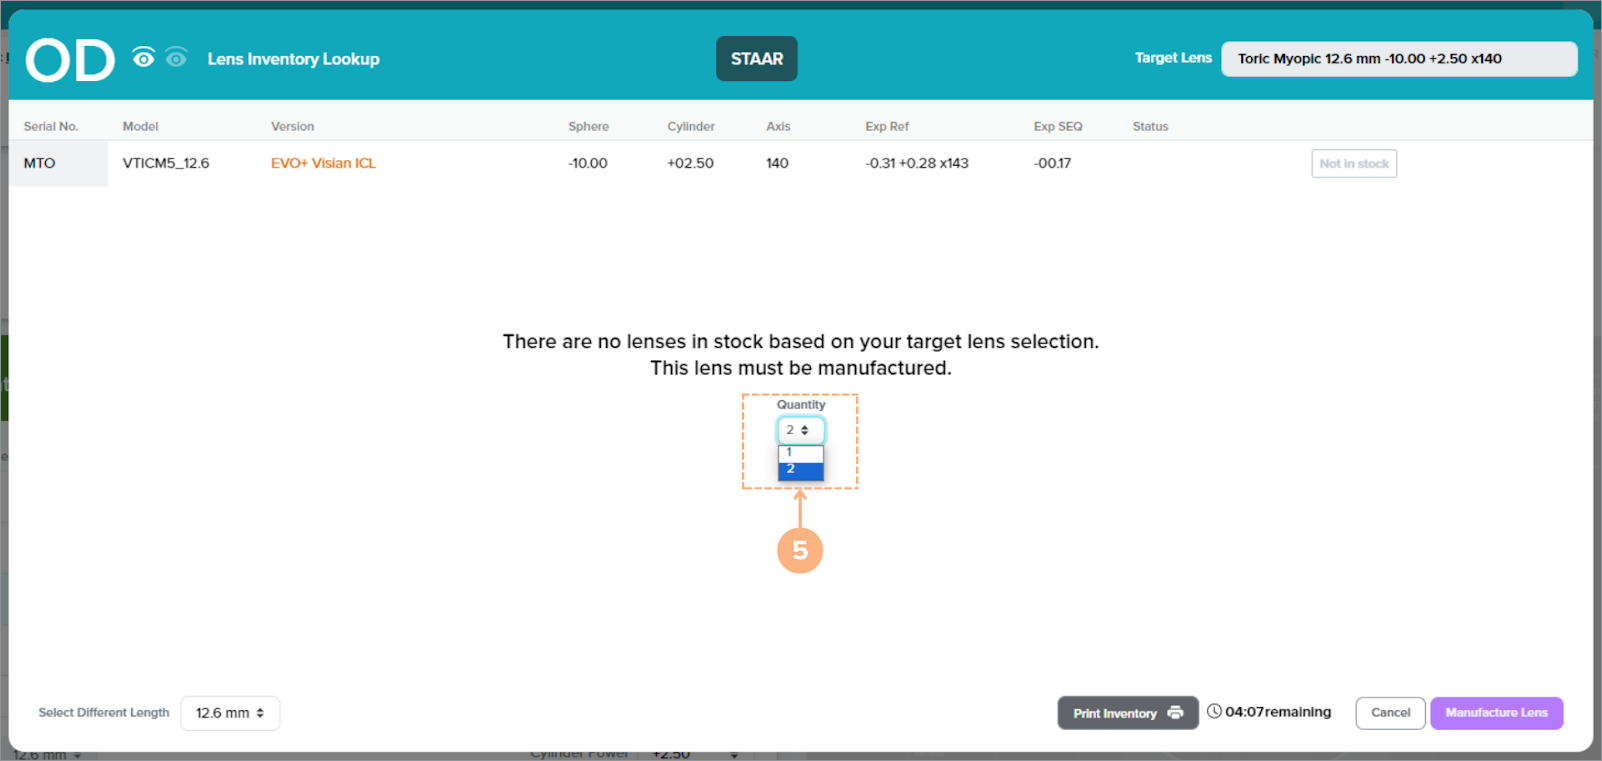
Select the desired quantity of lens you would like to manufacture by clicking on the drop-down button.
Note: For applicable countries, you may be able to select up to two lenses for each operative eye to manufacture.
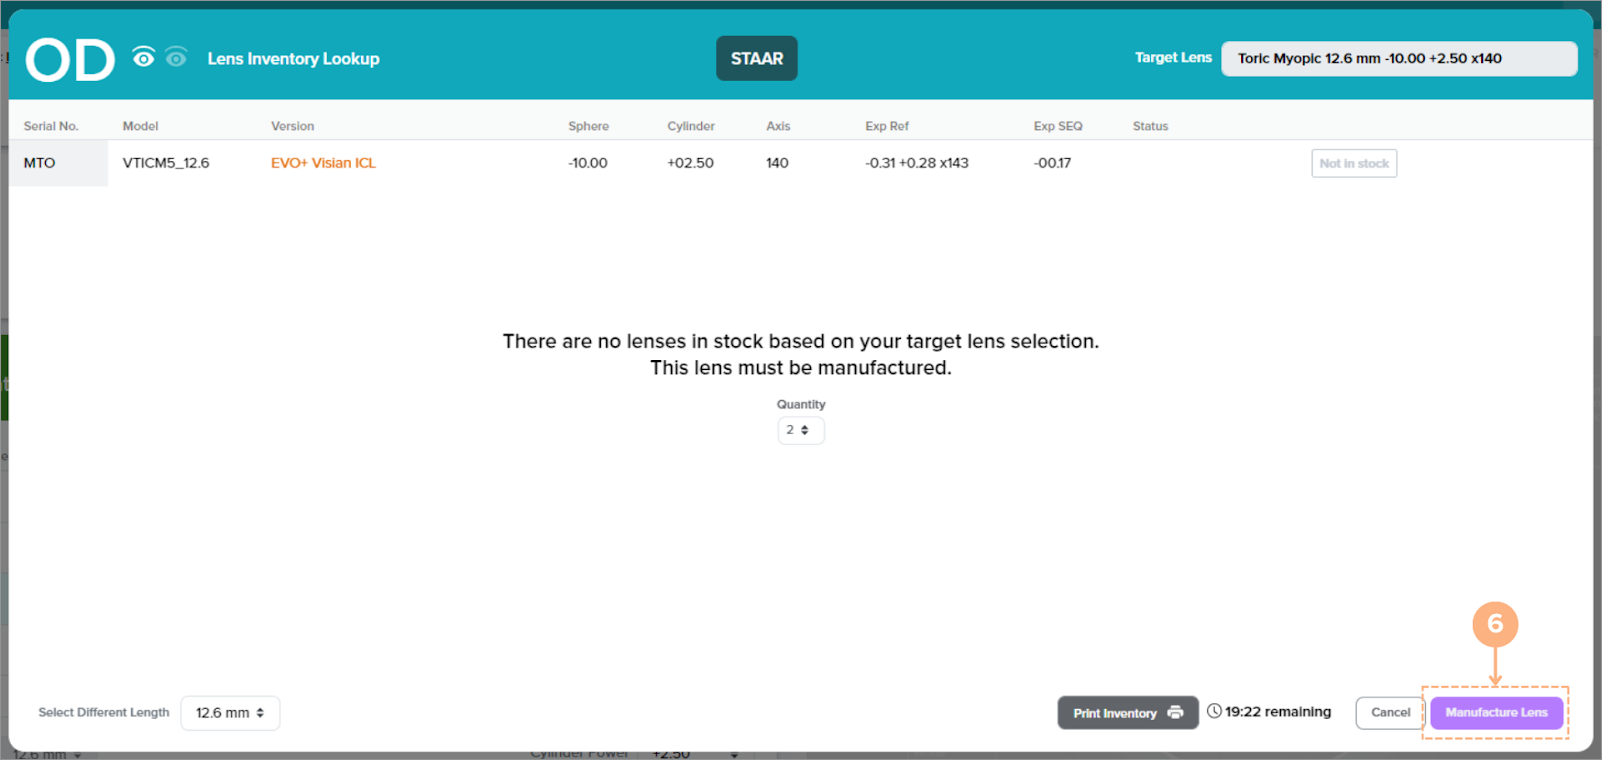
Click on the Manufacture Lens button to request the manufacture lens to be added to the shopping cart.
Note: If you would like to cancel the manufacture lens selection, click on the Cancel button to return to the original Lens Inventory Lookup screen.
After selecting all the desired lenses for the shopping cart, click on the Done button.
Listed is the lens for manufacture with Serial No. as Made to Order (MTO) and labeled as “In Cart.” This manufactured lens request may be removed by clicking on the “Cancel” button.
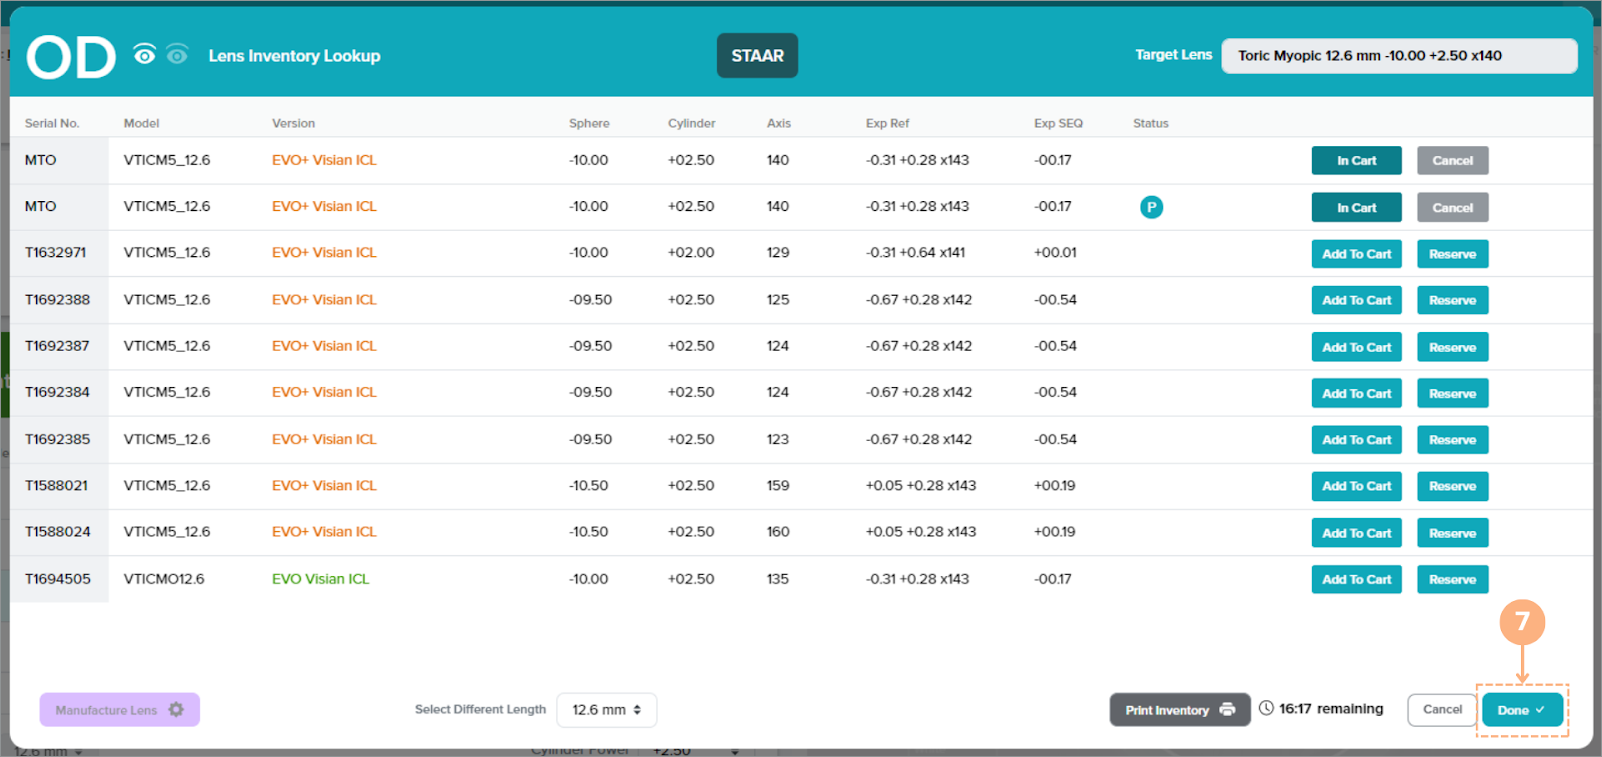
Clicking Done places the lens for manufacture in the shopping cart and locks the calculation for that operative eye. Once a calculation is locked, you can no longer make changes to the lens calculation. Although the calculation is locked, you can still view the Lens Inventory Lookup screen by clicking on the View Inventory button.
The shopping cart automatically populates with the lenses that you added to cart. To proceed to the shopping cart, refer to How to Access the Shopping Cart. Then to checkout, refer to How to Checkout your Lenses.
Multiple Lens Selection Note: For applicable countries and accounts, you may be able to select up to two lenses for each operative eye to Reserve, Add to Cart, or Manufacture. If you have not reached the maximum lens limit for an operative eye, you can still select additional lenses to Reserve, Add to Cart, or Manufacture through the View Inventory button.
Surgeons Who Order Through a Distributor Note: The Manufacture Lens button is not available to surgeons who order through a distributor. If you would like to order a manufactured lens, please contact your distributor.
Distributors: How to Add Pre-Order Lenses to the Shopping Cart
After your surgeons place pre-orders for lenses, these pre-orders are accessible on your Reservations tab. Please be mindful if the pre-order lenses are not ordered by the expiration date, the pre-orders will be automatically canceled. To add the pre-order lenses to your shopping cart for purchase:
Click on the Reservations tab.

Under Actions, click on the Add to cart (blue shopping cart) button.
You may also select multiple lenses to Add to cart at once by using the Select All tool. The status for lenses successfully placed in the shopping cart is labeled as “In Cart Pre-Order.”

The shopping cart automatically populates with the pre-order lenses that you added to cart. To proceed to the shopping cart, refer to How to Access the Shopping Cart, Then to checkout, refer to How to Checkout your Lenses.
Alternative Way to Add Individual Pre-Order Lens to the Shopping Cart
You may also individually add pre-order lenses to cart through the Reservation Details page. To individually add a pre-order lens to your shopping cart for purchase:
On the Reservations List, locate the pre-order lens and click on its reservation Number.

Confirm that the lens in the reservation is the correct pre-order lens.
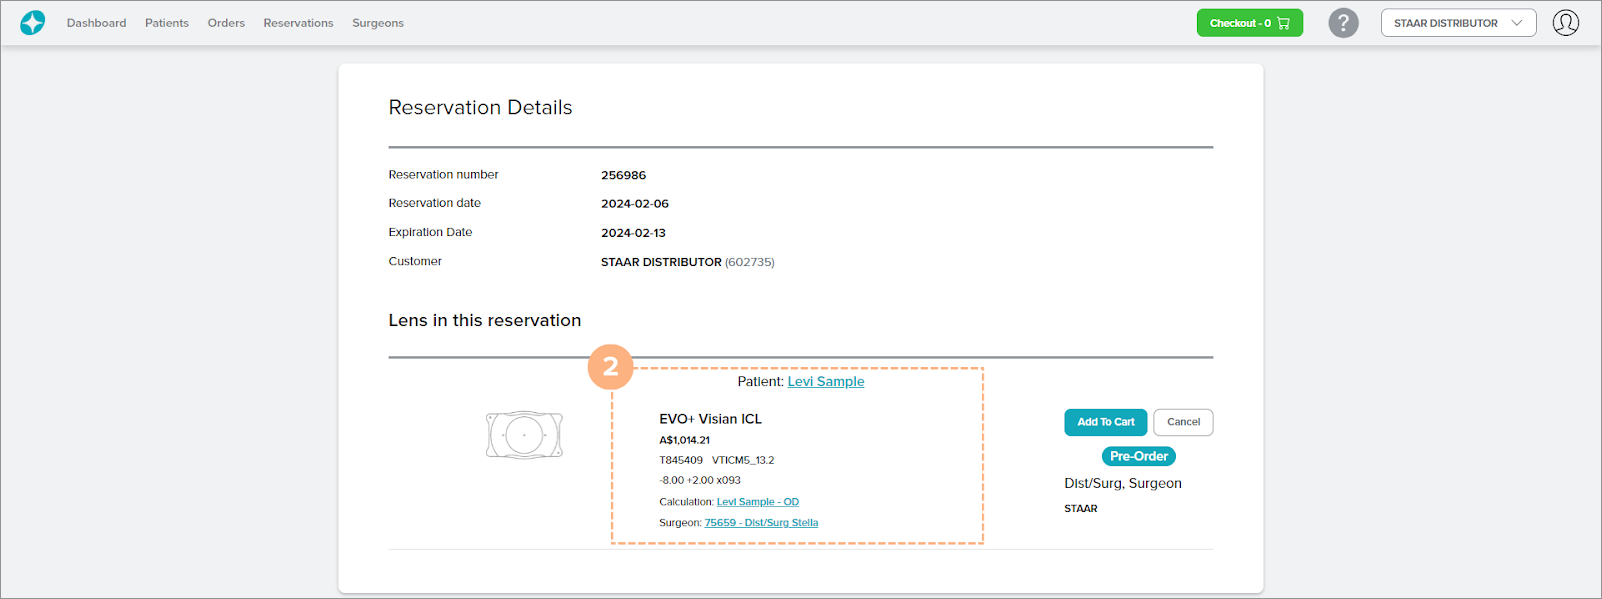
Click on the Add To Cart button.
The lens is labeled as “In Cart Pre-Order.”
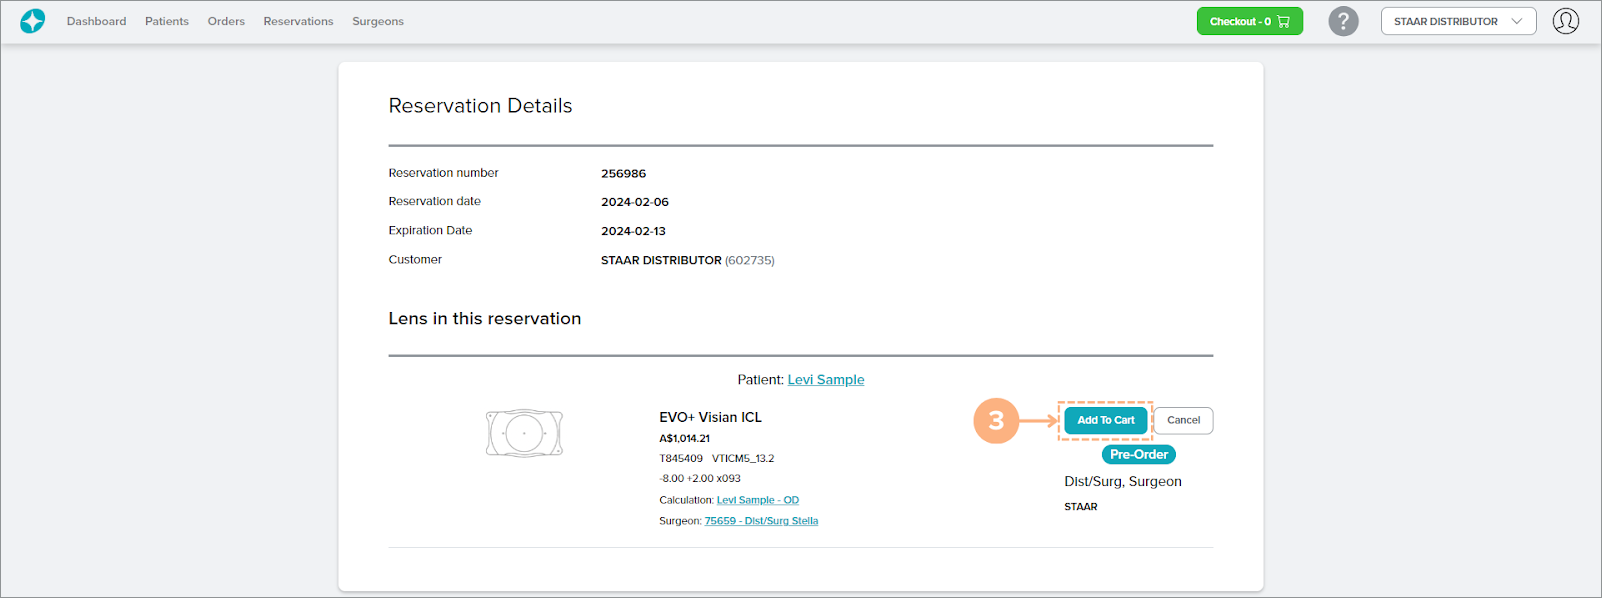
The shopping cart automatically populates with the pre-order lens that you added to cart. To proceed to the shopping cart, refer to How to Access the Shopping Cart, Then to checkout, refer to How to Checkout your Lenses.
Distributors: How to Cancel Pre-Order Lenses
If your surgeon requests for you to cancel their pre-order lenses, you may follow the same steps as How to Cancel Lens in Reservation to cancel pre-orders.
Lens Inventory Lookup Messages
When the Base Sphere of the selected lens is/are outside the approved range, the following message on the Lens Inventory Lookup will indicate that the lens is not available for order.
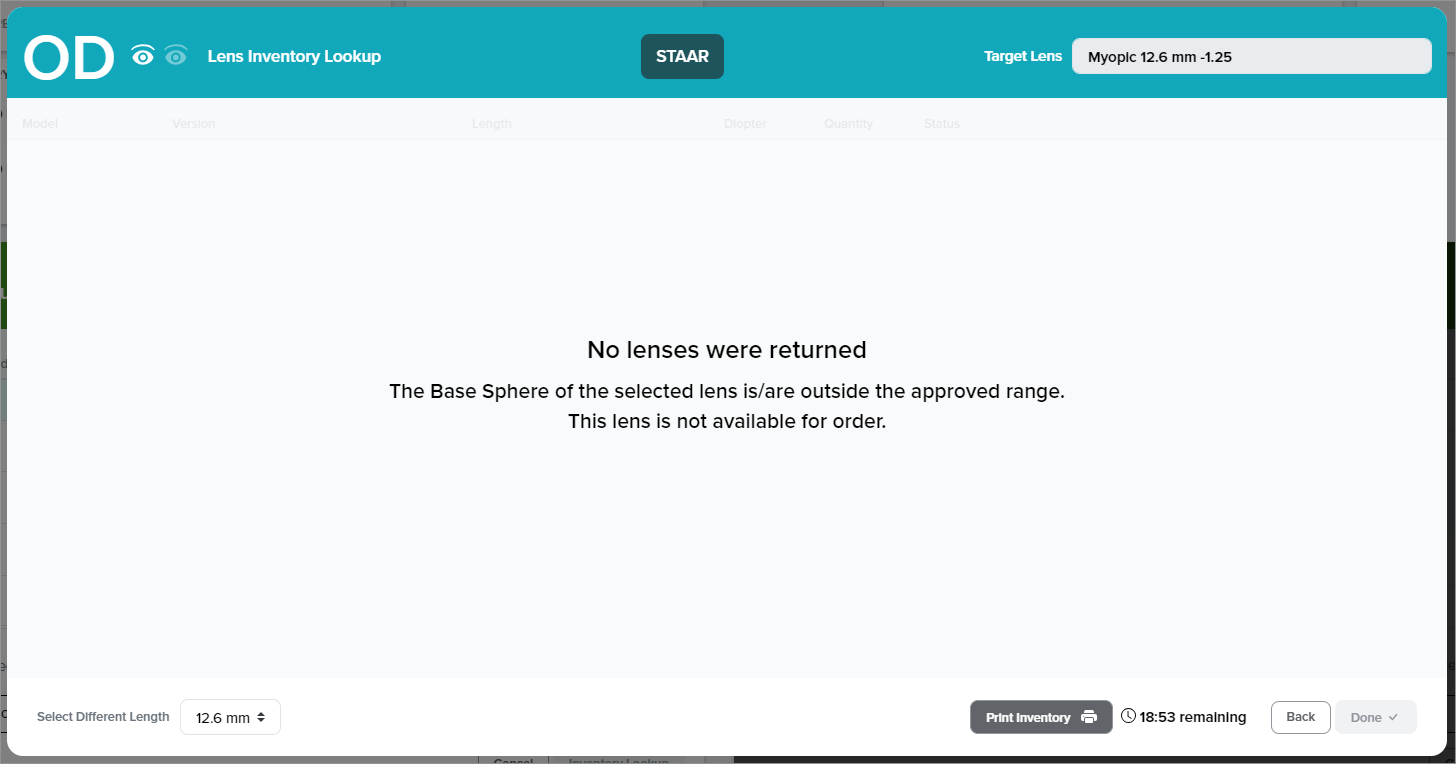
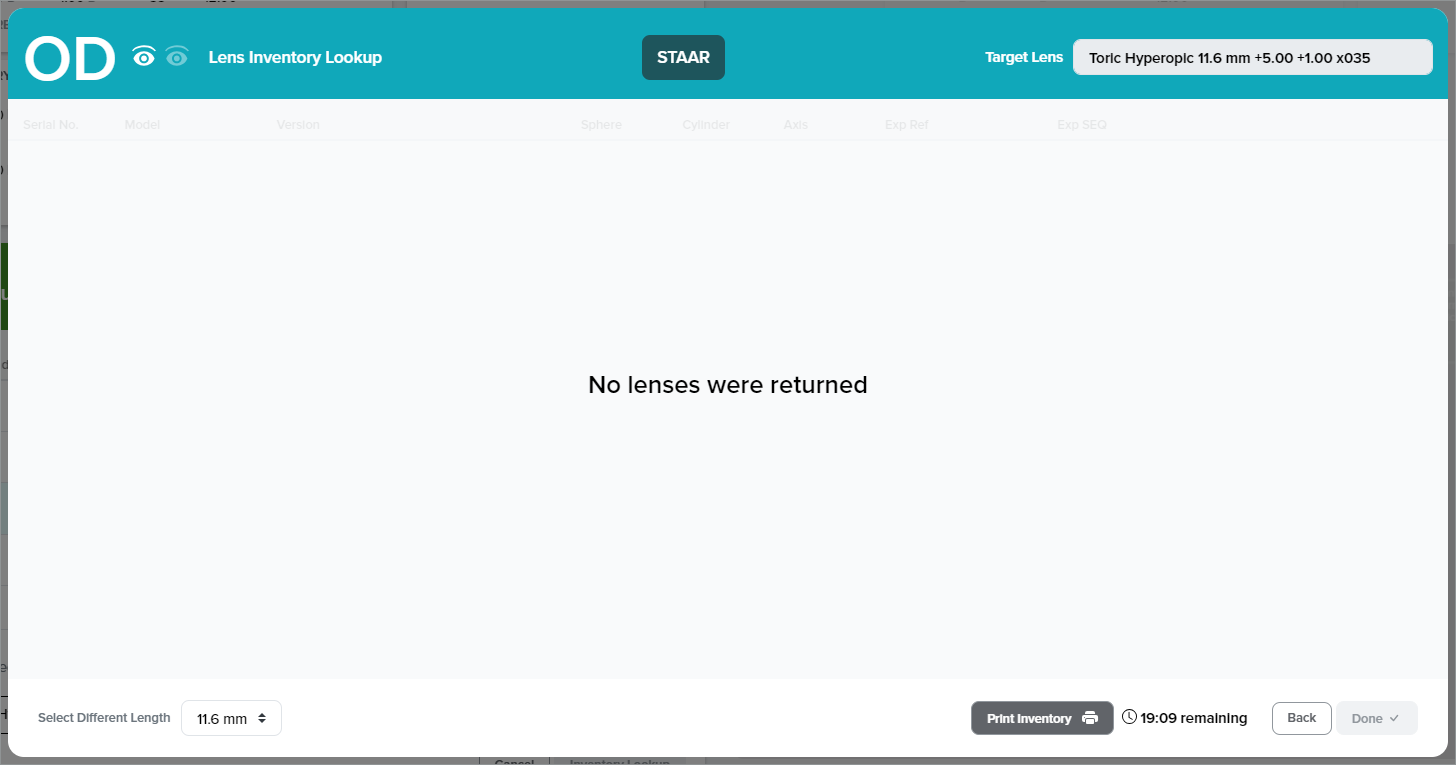
When there are no lenses available within your Target Lens, the following message on the Lens Inventory Lookup will indicate no lenses were returned.
How to Print the Inventory List
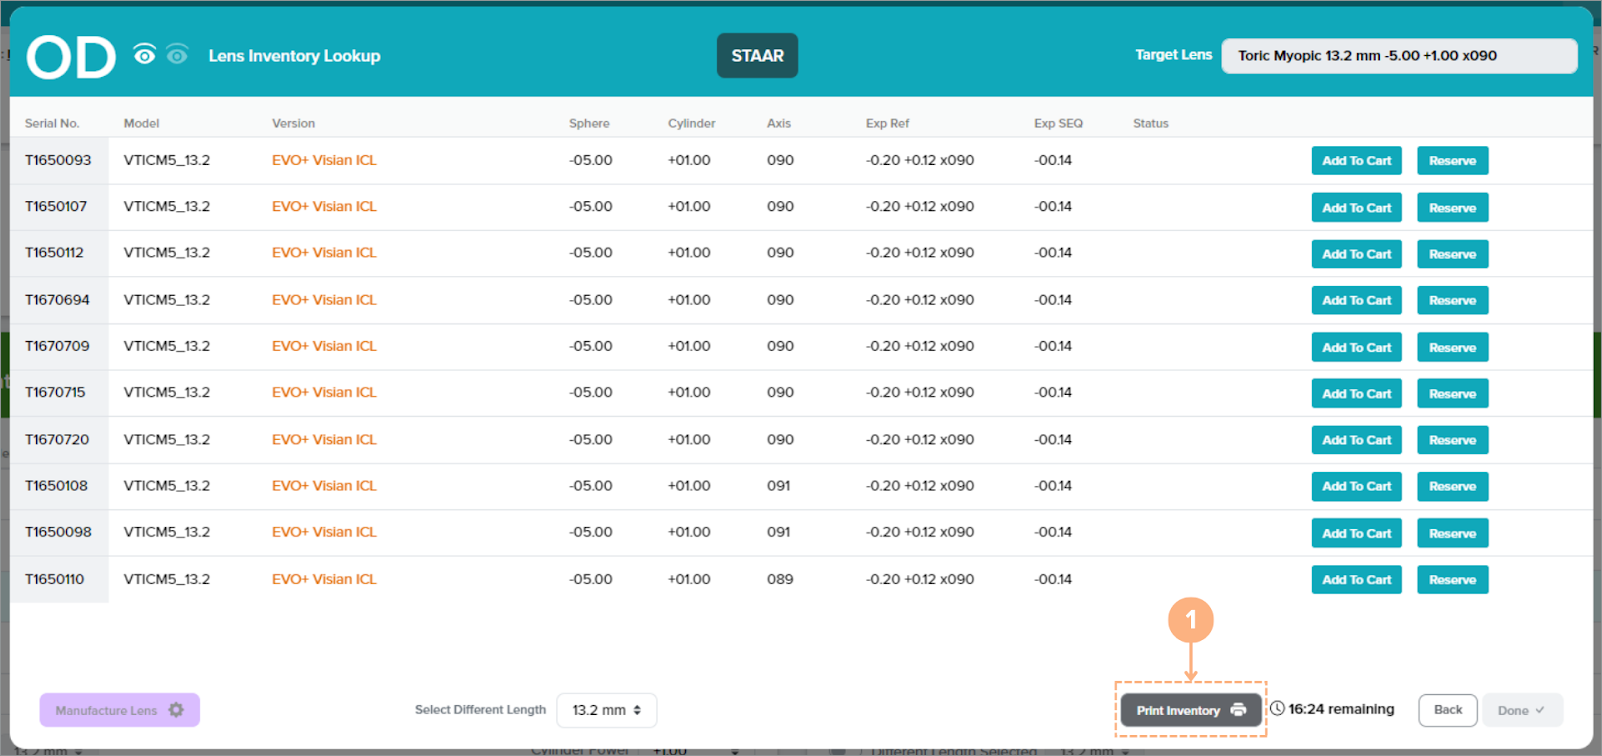
On the Lens Inventory Lookup screen, you may print a copy of the list of available lenses in the inventory. To print the inventory list:
Click on the Print Inventory button.
Click on the printer icon to initiate the print or click on the download button to save the PDF on your local or clinic network.
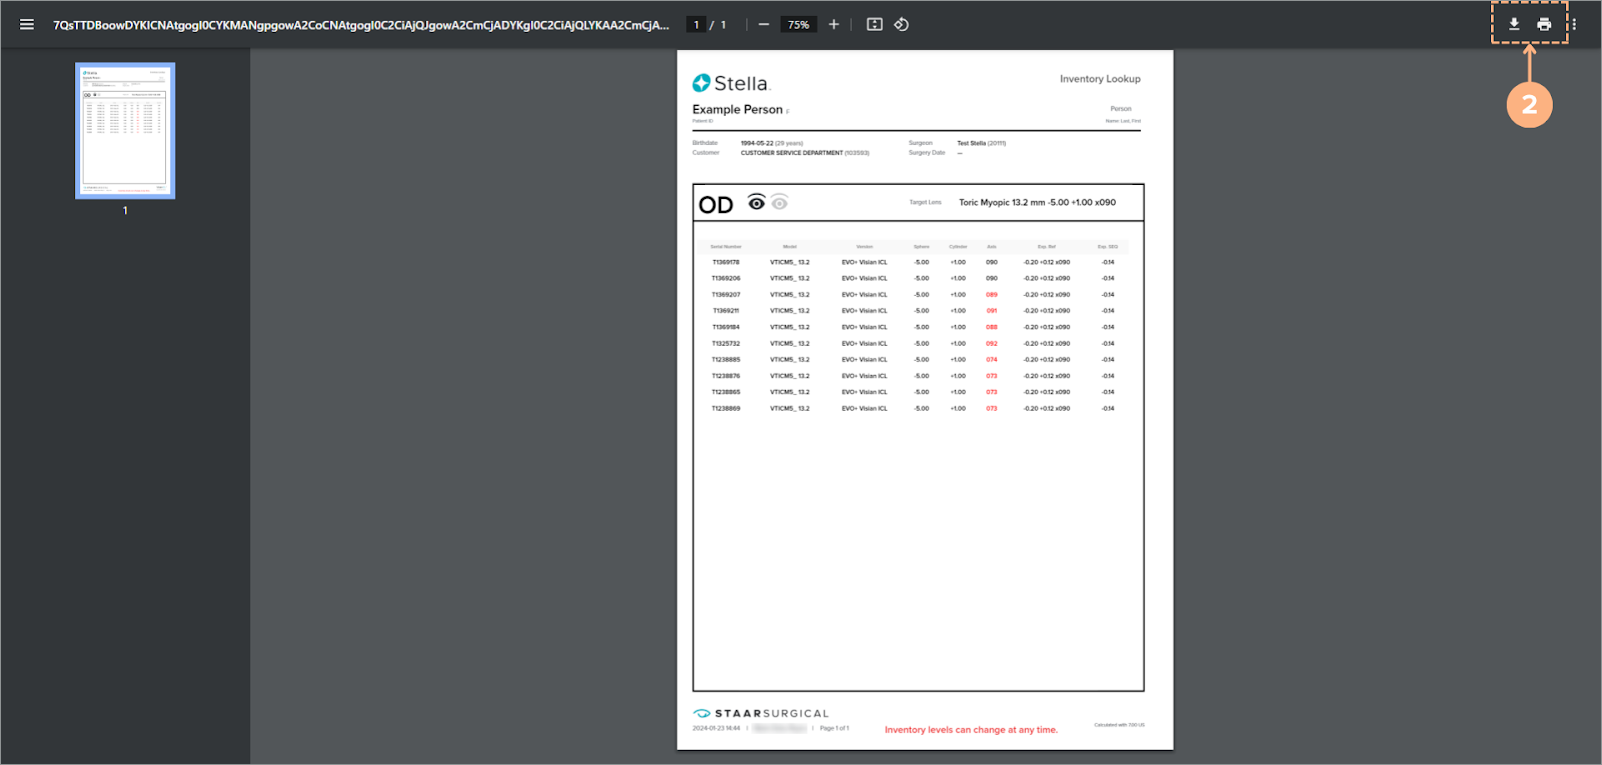
Note: Please be mindful that Inventory levels can change at any time. To access the most up-to-date inventory information, please view the real-time Lens Inventory Lookup screen on Stella™. In addition, differences between the prescription details, length, and model number of the reserved or ordered lens from the target lens will be color-coded in red.